往期热门博客项目回顾:
计算机视觉项目大集合
改进的yolo目标检测-测距测速
路径规划算法
图像去雨去雾+目标检测+测距项目
交通标志识别项目
yolo系列-重磅yolov9界面-最新的yolo
姿态识别-3d姿态识别
深度学习小白学习路线
GUI_OYQT_24">yolo GUI OYQT界面
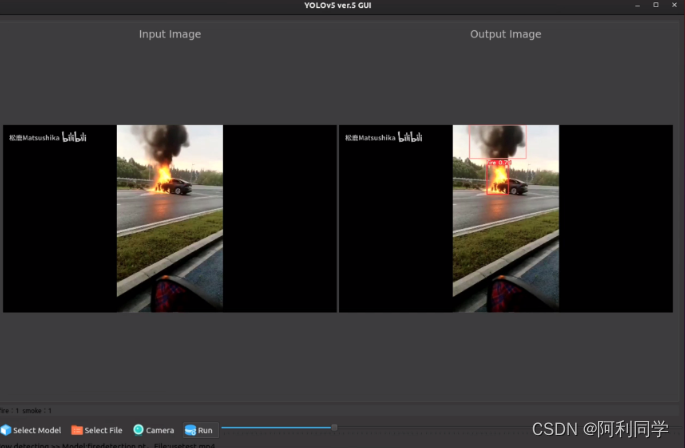
YOLOv5-GUI是一款专为YOLOv5(包括版本5和版本6)目标检测算法设计开发的图形用户界面(GUI)工具,采用强大的Qt框架构建。该工具汲取了Javacr大神在UI设计与逻辑方面的精华理念,旨在为广大用户提供更为直观、便捷且高效的YOLOv5模型训练、测试和应用体验。
- YOLOv5-GUI拥有深色和浅色两种主题风格供用户自由选择,满足不同场景下的视觉需求。深色模式有助于降低长时间使用电脑时的眼部疲劳,而浅色模式则适合在各种光照条件下保持清晰舒适的视觉效果。
- 此GUI工具集成了YOLOv5的核心功能,包括但不限于模型加载、参数配置、数据集管理、训练过程可视化监控、实时视频目标检测以及结果展示等环节。用户无需通过命令行操作,只需通过点击和拖拽等方式即可完成复杂的深度学习任务,极大降低了YOLOv5的使用门槛。
- 在实际应用中,YOLOv5-GUI能够帮助科研人员、开发者以及广大AI爱好者更高效地利用YOLOv5算法进行目标检测项目的研究与实践,无论是对已有的公开数据集进行模型训练优化,还是针对特定场景定制目标检测解决方案,都能轻松应对。
代码使用
切换到项目目录:
bash
cd [PyQt5-YOLOv5_V5/PyQt5-YOLOv5_V6]
接下来,安装所需的环境依赖:
bash
pip install -r requirements.txt
现在,你可以启动应用程序:
bash
python run.py
该GUI应用程序默认采用深色模式,但如果你想切换到浅色模式,只需在run.py文件中将main_ui_dark修改为main_ui_light即可。
- 这个GUI应用程序提供了许多功能和选项,可以帮助你使用YOLOv5更加方便和高效。你可以在界面上进行图像处理、对象检测等操作。另外,你也可以根据自己的需求对代码进行定制和扩展。
- 总的来说,这个项目为使用YOLOv5提供了一个直观和友好的界面,使得用户能够更轻松地利用这一强大的目标检测工具。希望你能享受使用这个GUI应用程序,并从中获得更多的收获和乐趣!
重要代码
 def run(self,
            imgsz=640,  # inference size (pixels)
            iou_thres=0.45,  # NMS IOU threshold
            max_det=1000,  # maximum detections per image
            device='',  # cuda device, i.e. 0 or 0,1,2,3 or cpu
            view_img=True,  # show results
            save_txt=False,  # save results to *.txt
            save_conf=False,  # save confidences in --save-txt labels
            save_crop=False,  # save cropped prediction boxes
            nosave=False,  # do not save images/videos
            classes=None,  # filter by class: --class 0, or --class 0 2 3
            agnostic_nms=False,  # class-agnostic NMS
            augment=False,  # augmented inference
            visualize=False,  # visualize features
            update=False,  # update all models
            project='runs/detect',  # save results to project/name
            name='exp',  # save results to project/name
            exist_ok=False,  # existing project/name ok, do not increment
            line_thickness=3,  # bounding box thickness (pixels)
            hide_labels=False,  # hide labels
            hide_conf=False,  # hide confidences
            half=False,  # use FP16 half-precision inference
            dnn=False,  # use OpenCV DNN for ONNX inference
            ):

        # Initialize
        device = select_device(device)
        half &= device.type != 'cpu'  # half precision only supported on CUDA

        # Load model
        model = DetectMultiBackend(self.weights, device=device, dnn=dnn)
        num_params = 0
        for param in model.parameters():
            num_params += param.numel()
        stride, names, pt, jit, onnx, engine = model.stride, model.names, model.pt, model.jit, model.onnx, model.engine
        imgsz = check_img_size(imgsz, s=stride)  # check image size
        names = model.module.names if hasattr(model, 'module') else model.names  # get class names
        if half:
            model.half()  # to FP16

        # Dataloader
        if self.source.isnumeric():
            view_img = check_imshow()
            cudnn.benchmark = True  # set True to speed up constant image size inference
            dataset = LoadStreams(self.source, img_size=imgsz, stride=stride, auto=pt and not jit)
            bs = len(dataset)  # batch_size
        else:
            dataset = LoadImages(self.source, img_size=imgsz, stride=stride, auto=pt and not jit)
            bs = 1  # batch_size
        vid_path, vid_writer = [None] * bs, [None] * bs

        # Run inference
        # model.warmup(imgsz=(1, 3, *imgsz), half=half)  # warmup
        dt, seen = [0.0, 0.0, 0.0], 0
        for path, im, im0s, self.vid_cap, s in dataset:
            statistic_dic = {name: 0 for name in names}
            t1 = time_sync()
            im = torch.from_numpy(im).to(device)
            im = im.half() if half else im.float()  # uint8 to fp16/32
            im /= 255  # 0 - 255 to 0.0 - 1.0
            if len(im.shape) == 3:
                im = im[None]  # expand for batch dim
            t2 = time_sync()
            dt[0] += t2 - t1

            # Inference
            pred = model(im, augment=augment)
            t3 = time_sync()
            dt[1] += t3 - t2

            # NMS
            pred = non_max_suppression(pred, self.conf_thres, iou_thres, classes, agnostic_nms, max_det=max_det)
            dt[2] += time_sync() - t3

            for i, det in enumerate(pred):  # detections per image
                im0 = im0s.copy()
                annotator = Annotator(im0, line_width=line_thickness, example=str(names))
                if len(det):
                    det[:, :4] = scale_coords(im.shape[2:], det[:, :4], im0.shape).round()
                    for c in det[:, -1].unique():
                        n = (det[:, -1] == c).sum()  # detections per class
                        s += f"{n} {names[int(c)]}{'s' * (n > 1)}, "  # add to string

                    for *xyxy, conf, cls in reversed(det):
                        c = int(cls)  # integer class
                        statistic_dic[names[c]] += 1
                        label = None if hide_labels else (names[c] if hide_conf else f'{names[c]} {conf:.2f}')
                        annotator.box_label(xyxy, label, color=colors(c, True))


            time.sleep(1/40)
            # print(type(im0s))
            self.send_img.emit(im0)
            self.send_raw.emit(im0s if isinstance(im0s, np.ndarray) else im0s[0])
            self.send_statistic.emit(statistic_dic)
最后:计算机视觉、图像处理、毕业辅导、作业帮助、代码获取,远程协助,代码定制,私聊会回复!
#code全部代码:qq1309399183