编辑:OAK中国
首发:oakchina.cn
喜欢的话,请多多👍⭐️✍
内容可能会不定期更新,官网内容都是最新的,请查看首发地址链接。
▌前言
Hello,大家好,这里是OAK中国,我是助手君。
最近咱社群里有几个朋友在将yolox转换成blob的过程有点不清楚,所以我就写了这篇博客。(请夸我贴心!咱的原则:合理要求,有求必应!)
1.其他Yolo转换及使用教程请参考
2.检测类的yolo模型建议使用在线转换(地址),如果在线转换不成功,你再根据本教程来做本地转换。
▌ .pth 转换为 .onnx
可以使用预训练模型(onnx) releases
或者使用 YOLOX 自带的 export_onnx 将 pytorch 模型转换为 onnx 模型
可参考 Convert Your Model to ONNX
简单示例
python3 tools/export_onnx.py --output-name yolox_nano.onnx -n yolox_nano-s -c yolox_nano.pth
▌编辑 ONNX 模型
可以使用 Netron 查看模型结构

我们需要的是上图红框标出的 3 个 Concat 层,并将其命名为 output1_yolov6,output2_yolov6,output3_yolov6。(我们使用 oak 中解析 anchor free 的预制方法(yolov6))
# coding=utf-8
import onnx

onnx_model = onnx.load("yolox_nano.onnx")

concat_indices = []
for i, n in enumerate(onnx_model.graph.node):
    if "Concat" in n.name:
        concat_indices.append(i)
input1, input2, input3 = concat_indices[-4:-1]

onnx_model.graph.node[input1].name = 'output1_yolov6'
onnx_model.graph.node[input2].name = 'output2_yolov6'
onnx_model.graph.node[input3].name = 'output3_yolov6'


onnx.save(onnx_model, "yolox_nano.onnx")

▌转换
openvino 本地转换
onnx -> openvino
mo 是 openvino_dev 2022.1 中脚本,
安装命令为
pip install openvino-dev
mo --input_model yolox_nano.onnx --reverse_input_channel --output "output1_yolov6,output2_yolov6,output3_yolov6"
openvino -> blob
<path>/compile_tool -m yolox_nano.xml \
-ip U8 -d MYRIAD \
-VPU_NUMBER_OF_SHAVES 6 \
-VPU_NUMBER_OF_CMX_SLICES 6
在线转换
blobconvert 网页 http://blobconverter.luxonis.com/
- 进入网页,按下图指示操作:

- 修改参数,转换模型:
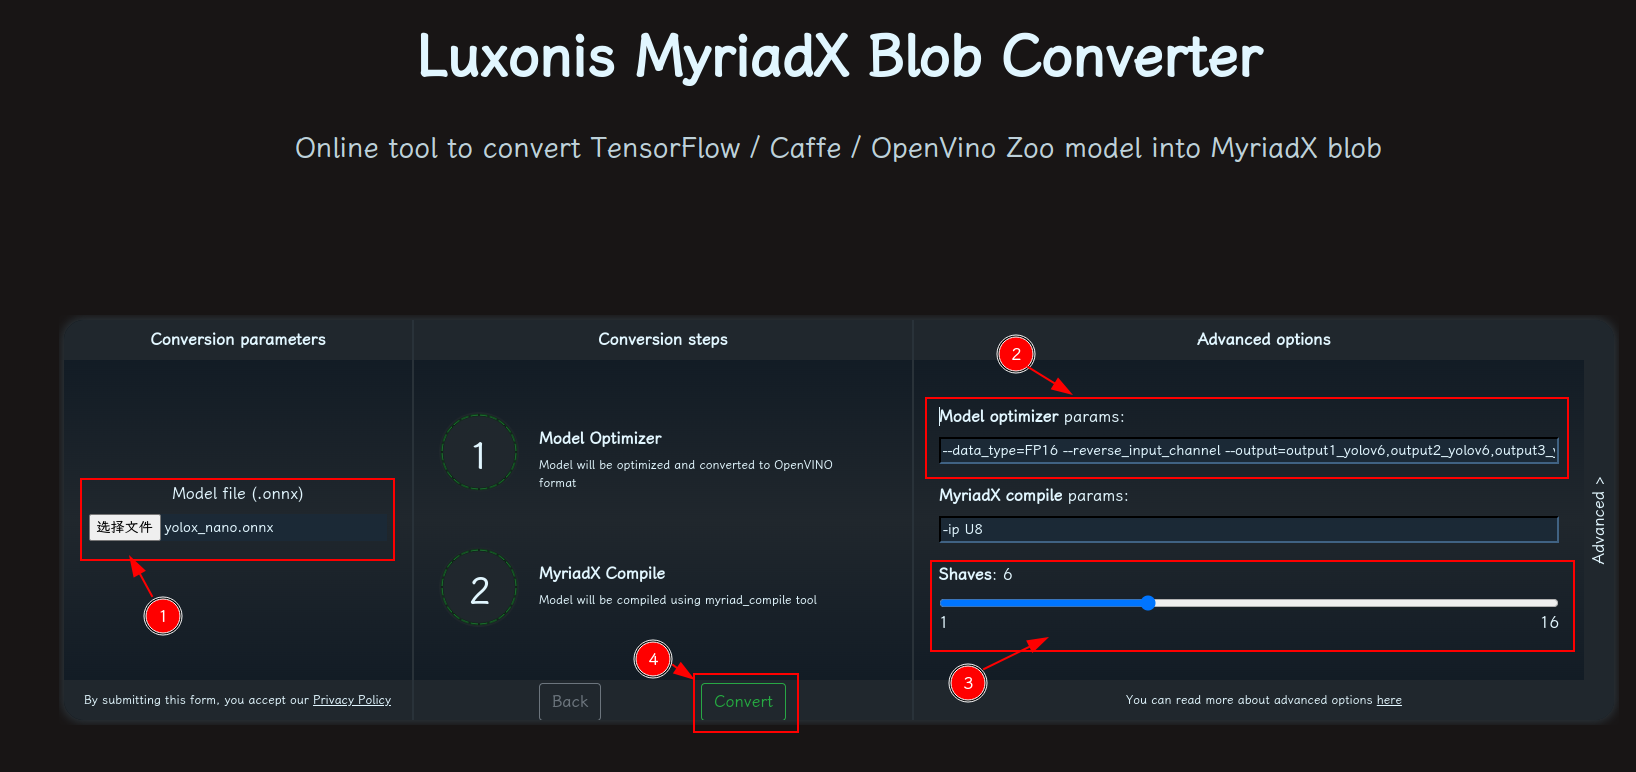
- 选择 onnx 模型
- 修改
optimizer_params为--data_type=FP16 --reverse_input_channel --output=output1_yolov6,output2_yolov6,output3_yolov6 - 修改
shaves为6 - 转换
blobconverter python 代码
blobconverter.from_onnx(
            "yolox_nano.onnx",
            optimizer_params=[
                "--reverse_input_channel",
                "--output=output1_yolov6,output2_yolov6,output3_yolov6",
            ],
            shaves=6,
        )
blobconvert cli
blobconverter --onnx yolox_nano.onnx -sh 6 -o . --optimizer-params "reverse_input_channel --output=output1_yolov6,output2_yolov6,output3_yolov6"
▌DepthAI 示例
正确解码需要可配置的网络相关参数:
- setNumClasses - YOLO 检测类别的数量
- setIouThreshold - iou 阈值
- setConfidenceThreshold - 置信度阈值,低于该阈值的对象将被过滤掉
import cv2
import depthai as dai
import numpy as np

model = dai.OpenVINO.Blob("yolox_nano.blob")
dim = model.networkInputs.get("images").dims
W, H = dim[:2]
labelMap = [
    # "class_1","class_2","..."
    "class_%s"%i for i in range(80)
]

# Create pipeline
pipeline = dai.Pipeline()

# Define sources and outputs
camRgb = pipeline.create(dai.node.ColorCamera)
detectionNetwork = pipeline.create(dai.node.YoloDetectionNetwork)
xoutRgb = pipeline.create(dai.node.XLinkOut)
nnOut = pipeline.create(dai.node.XLinkOut)

xoutRgb.setStreamName("rgb")
nnOut.setStreamName("nn")

# Properties
camRgb.setPreviewSize(W, H)
camRgb.setResolution(dai.ColorCameraProperties.SensorResolution.THE_1080_P)
camRgb.setInterleaved(False)
camRgb.setColorOrder(dai.ColorCameraProperties.ColorOrder.BGR)
camRgb.setFps(40)

# Network specific settings
detectionNetwork.setBlob(model)
detectionNetwork.setConfidenceThreshold(0.5)
detectionNetwork.setNumClasses(80)
detectionNetwork.setCoordinateSize(4)
detectionNetwork.setAnchors([])
detectionNetwork.setAnchorMasks({})
detectionNetwork.setIouThreshold(0.5)

# Linking
camRgb.preview.link(detectionNetwork.input)
camRgb.preview.link(xoutRgb.input)
detectionNetwork.out.link(nnOut.input)

# Connect to device and start pipeline
with dai.Device(pipeline) as device:
    # Output queues will be used to get the rgb frames and nn data from the outputs defined above
    qRgb = device.getOutputQueue(name="rgb", maxSize=4, blocking=False)
    qDet = device.getOutputQueue(name="nn", maxSize=4, blocking=False)

    frame = None
    detections = []
    color2 = (255, 255, 255)

    # nn data, being the bounding box locations, are in <0..1> range - they need to be normalized with frame width/height
    def frameNorm(frame, bbox):
        normVals = np.full(len(bbox), frame.shape[0])
        normVals[::2] = frame.shape[1]
        return (np.clip(np.array(bbox), 0, 1) * normVals).astype(int)

    def displayFrame(name, frame):
        color = (255, 0, 0)
        for detection in detections:
            bbox = frameNorm(frame, (detection.xmin, detection.ymin, detection.xmax, detection.ymax))
            cv2.putText(frame, labelMap[detection.label], (bbox[0] + 10, bbox[1] + 20), cv2.FONT_HERSHEY_TRIPLEX, 0.5, 255)
            cv2.putText(frame, f"{int(detection.confidence * 100)}%", (bbox[0] + 10, bbox[1] + 40), cv2.FONT_HERSHEY_TRIPLEX, 0.5, 255)
            cv2.rectangle(frame, (bbox[0], bbox[1]), (bbox[2], bbox[3]), color, 2)
        # Show the frame
        cv2.imshow(name, frame)

    while True:
        inRgb = qRgb.tryGet()
        inDet = qDet.tryGet()

        if inRgb is not None:
            frame = inRgb.getCvFrame()

        if inDet is not None:
            detections = inDet.detections


        if frame is not None:
            displayFrame("rgb", frame)

        if cv2.waitKey(1) == ord('q'):
            break
▌参考资料
https://www.oakchina.cn/2023/02/23/yolox-blob/
https://docs.oakchina.cn/en/latest/
https://www.oakchina.cn/selection-guide/
OAK中国
| OpenCV AI Kit在中国区的官方代理商和技术服务商
| 追踪AI技术和产品新动态
戳「+关注」获取最新资讯↗↗