本文为🔗365天深度学习训练营 中的学习记录博客
原作者:K同学啊|接辅导、项目定制
我的环境:
1.语言:python3.7
2.编译器:pycharm
3.深度学习框架Tensorflow/Pytorch 1.8.0+cu111
一、代码解读
import argparse
import contextlib
import os
import platform
import sys
from copy import deepcopy
from pathlib import Path

FILE = Path(__file__).resolve()
ROOT = FILE.parents[1]  # YOLOv5 root directory
if str(ROOT) not in sys.path:
    sys.path.append(str(ROOT))  # add ROOT to PATH
if platform.system() != 'Windows':
    ROOT = Path(os.path.relpath(ROOT, Path.cwd()))  # relative

from models.common import *  # noqa
from models.experimental import *  # noqa
from utils.autoanchor import check_anchor_order
from utils.general import LOGGER, check_version, check_yaml, make_divisible, print_args
from utils.plots import feature_visualization
from utils.torch_utils import (fuse_conv_and_bn, initialize_weights, model_info, profile, scale_img, select_device,
                               time_sync)

try:
    import thop  # for FLOPs computation
except ImportError:
thop = Noneargparse用于命令行参数解析contextlib用于上下文管理os和platform用于操作系统和平台相关的功能deepcopy用于深拷贝对象Path用于处理文件路径- 尝试导入
thop库,用于计算模型的浮点运算量
FILE 是当前文件的绝对路径
ROOT 是当前文件的父目录的父目录
Detect类
class Detect(nn.Module):
    # YOLOv5 Detect head for detection models
    stride = None  # strides computed during build
    dynamic = False  # force grid reconstruction
    export = False  # export mode

    def __init__(self, nc=80, anchors=(), ch=(), inplace=True):  # detection layer
        super().__init__()
        self.nc = nc  # number of classes
        self.no = nc + 5  # number of outputs per anchor
        self.nl = len(anchors)  # number of detection layers
        self.na = len(anchors[0]) // 2  # number of anchors
        self.grid = [torch.empty(0) for _ in range(self.nl)]  # init grid
        self.anchor_grid = [torch.empty(0) for _ in range(self.nl)]  # init anchor grid
        self.register_buffer('anchors', torch.tensor(anchors).float().view(self.nl, -1, 2))  # shape(nl,na,2)
        self.m = nn.ModuleList(nn.Conv2d(x, self.no * self.na, 1) for x in ch)  # output conv
        self.inplace = inplace  # use inplace ops (e.g. slice assignment)

    def forward(self, x):
        z = []  # inference output
        for i in range(self.nl):
            x[i] = self.m[i](x[i])  # conv
            bs, _, ny, nx = x[i].shape  # x(bs,255,20,20) to x(bs,3,20,20,85)
            x[i] = x[i].view(bs, self.na, self.no, ny, nx).permute(0, 1, 3, 4, 2).contiguous()

            if not self.training:  # inference
                if self.dynamic or self.grid[i].shape[2:4] != x[i].shape[2:4]:
                    self.grid[i], self.anchor_grid[i] = self._make_grid(nx, ny, i)

                if isinstance(self, Segment):  # (boxes + masks)
                    xy, wh, conf, mask = x[i].split((2, 2, self.nc + 1, self.no - self.nc - 5), 4)
                    xy = (xy.sigmoid() * 2 + self.grid[i]) * self.stride[i]  # xy
                    wh = (wh.sigmoid() * 2) ** 2 * self.anchor_grid[i]  # wh
                    y = torch.cat((xy, wh, conf.sigmoid(), mask), 4)
                else:  # Detect (boxes only)
                    xy, wh, conf = x[i].sigmoid().split((2, 2, self.nc + 1), 4)
                    xy = (xy * 2 + self.grid[i]) * self.stride[i]  # xy
                    wh = (wh * 2) ** 2 * self.anchor_grid[i]  # wh
                    y = torch.cat((xy, wh, conf), 4)
                z.append(y.view(bs, self.na * nx * ny, self.no))

        return x if self.training else (torch.cat(z, 1), ) if self.export else (torch.cat(z, 1), x)

    def _make_grid(self, nx=20, ny=20, i=0, torch_1_10=check_version(torch.__version__, '1.10.0')):
        d = self.anchors[i].device
        t = self.anchors[i].dtype
        shape = 1, self.na, ny, nx, 2  # grid shape
        y, x = torch.arange(ny, device=d, dtype=t), torch.arange(nx, device=d, dtype=t)
        yv, xv = torch.meshgrid(y, x, indexing='ij') if torch_1_10 else torch.meshgrid(y, x)  # torch>=0.7 compatibility
        grid = torch.stack((xv, yv), 2).expand(shape) - 0.5  # add grid offset, i.e. y = 2.0 * x - 0.5
        anchor_grid = (self.anchors[i] * self.stride[i]).view((1, self.na, 1, 1, 2)).expand(shape)
        return grid, anchor_grid
stride:用于存储在构建期间计算的步幅(strides),在前向传播中使用。dynamic和export:这两个属性都是布尔值,分别用于指示是否强制进行网格重构和导出模式。__init__方法:初始化函数,接受一些参数,包括nc(类别数)、anchors(锚框)、ch(通道数)、inplace(是否使用原地操作)。nc:类别数no:每个锚框的输出数(类别数加上5)nl:检测层的数量(锚框的数量)na:每个检测层的锚框数量grid和anchor_grid:用于存储网格和锚框网格的空列表anchors:将锚框转换为张量并注册为缓冲区m:输出卷积的模块列表
forward方法:前向传播函数,接受输入张量x,并返回输出张量。- 循环遍历每个检测层
- 对输入进行卷积操作,并调整形状以适应后续处理
- 如果不是训练模式,则进行推理操作
- 根据是否是分割模式,对不同的输出进行不同的处理
- 将处理后的输出添加到列表
z中 - 返回输出张量
x(如果是训练模式)、合并后的检测结果张量(如果是导出模式)或者分别返回这两者(如果不是训练模式且不是导出模式)
_make_grid方法:用于生成网格和锚框网格。- 创建网格和锚框网格
- 根据输入的尺寸和索引调整形状
- 返回网格和锚框网格
parse_model函数
def parse_model(d, ch):  # model_dict, input_channels(3)
    # Parse a YOLOv5 model.yaml dictionary
    LOGGER.info(f"\n{'':>3}{'from':>18}{'n':>3}{'params':>10}  {'module':<40}{'arguments':<30}")
    anchors, nc, gd, gw, act = d['anchors'], d['nc'], d['depth_multiple'], d['width_multiple'], d.get('activation')
    if act:
        Conv.default_act = eval(act)  # redefine default activation, i.e. Conv.default_act = nn.SiLU()
        LOGGER.info(f"{colorstr('activation:')} {act}")  # print
    na = (len(anchors[0]) // 2) if isinstance(anchors, list) else anchors  # number of anchors
    no = na * (nc + 5)  # number of outputs = anchors * (classes + 5)

    layers, save, c2 = [], [], ch[-1]  # layers, savelist, ch out
    for i, (f, n, m, args) in enumerate(d['backbone'] + d['head']):  # from, number, module, args
        m = eval(m) if isinstance(m, str) else m  # eval strings
        for j, a in enumerate(args):
            with contextlib.suppress(NameError):
                args[j] = eval(a) if isinstance(a, str) else a  # eval strings

        n = n_ = max(round(n * gd), 1) if n > 1 else n  # depth gain
        if m in {
                Conv, GhostConv, Bottleneck, GhostBottleneck, SPP, SPPF, DWConv, MixConv2d, Focus, CrossConv,
                BottleneckCSP, C3, C3TR, C3SPP, C3Ghost, nn.ConvTranspose2d, DWConvTranspose2d, C3x}:
            c1, c2 = ch[f], args[0]
            if c2 != no:  # if not output
                c2 = make_divisible(c2 * gw, 8)

            args = [c1, c2, *args[1:]]
            if m in {BottleneckCSP, C3, C3TR, C3Ghost, C3x}:
                args.insert(2, n)  # number of repeats
                n = 1
        elif m is nn.BatchNorm2d:
            args = [ch[f]]
        elif m is Concat:
            c2 = sum(ch[x] for x in f)
        # TODO: channel, gw, gd
        elif m in {Detect, Segment}:
            args.append([ch[x] for x in f])
            if isinstance(args[1], int):  # number of anchors
                args[1] = [list(range(args[1] * 2))] * len(f)
            if m is Segment:
                args[3] = make_divisible(args[3] * gw, 8)
        elif m is Contract:
            c2 = ch[f] * args[0] ** 2
        elif m is Expand:
            c2 = ch[f] // args[0] ** 2
        else:
            c2 = ch[f]

        m_ = nn.Sequential(*(m(*args) for _ in range(n))) if n > 1 else m(*args)  # module
        t = str(m)[8:-2].replace('__main__.', '')  # module type
        np = sum(x.numel() for x in m_.parameters())  # number params
        m_.i, m_.f, m_.type, m_.np = i, f, t, np  # attach index, 'from' index, type, number params
        LOGGER.info(f'{i:>3}{str(f):>18}{n_:>3}{np:10.0f}  {t:<40}{str(args):<30}')  # print
        save.extend(x % i for x in ([f] if isinstance(f, int) else f) if x != -1)  # append to savelist
        layers.append(m_)
        if i == 0:
            ch = []
        ch.append(c2)
    return nn.Sequential(*layers), sorted(save)
该函数将模型的模块拼接起来,搭建完成网络模型。如果要改动模型框架,需要修改此函数。
- 从配置信息中提取 anchors、nc(类别数)、gd(深度倍数)、gw(宽度倍数)和激活函数类型。
- 遍历配置中的
backbone和head,这两个部分描述了模型的骨干网络和检测头。 - 对于每个模块,根据其类型进行相应的处理:
- 如果是卷积层(如 Conv、Bottleneck 等),根据深度倍数和宽度倍数调整输出通道数,并创建相应的模块。
- 如果是 BatchNorm2d,则根据输入通道数创建模块。
- 如果是 Concat,则根据输入通道数的总和创建模块。
- 如果是 Detect 或 Segment,则根据输入通道数列表创建模块,并根据宽度倍数调整参数。
- 如果是 Contract 或 Expand,则根据输入通道数和倍数调整输出通道数。
- 创建模块实例,并记录相关信息,如模块类型、参数数量等。
- 将构建好的模块添加到网络层序列中,并将需要保存输出的层索引记录下来。
- 最后返回构建好的模型和需要保存输出的层索引。
BaseModel类
class BaseModel(nn.Module):
    # YOLOv5 base model
    def forward(self, x, profile=False, visualize=False):
        return self._forward_once(x, profile, visualize)  # single-scale inference, train

    def _forward_once(self, x, profile=False, visualize=False):
        y, dt = [], []  # outputs
        for m in self.model:
            if m.f != -1:  # if not from previous layer
                x = y[m.f] if isinstance(m.f, int) else [x if j == -1 else y[j] for j in m.f]  # from earlier layers
            if profile:
                self._profile_one_layer(m, x, dt)
            x = m(x)  # run
            y.append(x if m.i in self.save else None)  # save output
            if visualize:
                feature_visualization(x, m.type, m.i, save_dir=visualize)
        return x

    def _profile_one_layer(self, m, x, dt):
        c = m == self.model[-1]  # is final layer, copy input as inplace fix
        o = thop.profile(m, inputs=(x.copy() if c else x, ), verbose=False)[0] / 1E9 * 2 if thop else 0  # FLOPs
        t = time_sync()
        for _ in range(10):
            m(x.copy() if c else x)
        dt.append((time_sync() - t) * 100)
        if m == self.model[0]:
            LOGGER.info(f"{'time (ms)':>10s} {'GFLOPs':>10s} {'params':>10s}  module")
        LOGGER.info(f'{dt[-1]:10.2f} {o:10.2f} {m.np:10.0f}  {m.type}')
        if c:
            LOGGER.info(f"{sum(dt):10.2f} {'-':>10s} {'-':>10s}  Total")

    def fuse(self):  # fuse model Conv2d() + BatchNorm2d() layers
        LOGGER.info('Fusing layers... ')
        for m in self.model.modules():
            if isinstance(m, (Conv, DWConv)) and hasattr(m, 'bn'):
                m.conv = fuse_conv_and_bn(m.conv, m.bn)  # update conv
                delattr(m, 'bn')  # remove batchnorm
                m.forward = m.forward_fuse  # update forward
        self.info()
        return self

    def info(self, verbose=False, img_size=640):  # print model information
        model_info(self, verbose, img_size)

    def _apply(self, fn):
        # Apply to(), cpu(), cuda(), half() to model tensors that are not parameters or registered buffers
        self = super()._apply(fn)
        m = self.model[-1]  # Detect()
        if isinstance(m, (Detect, Segment)):
            m.stride = fn(m.stride)
            m.grid = list(map(fn, m.grid))
            if isinstance(m.anchor_grid, list):
                m.anchor_grid = list(map(fn, m.anchor_grid))
        return self
BaseModel 类是 YOLOv5 模型的基类,包含了一些用于模型前向推断、性能评估和模型信息打印等方法。
-
forward(self, x, profile=False, visualize=False): 定义了模型的前向传播过程。根据参数profile和visualize的设置,选择是否进行性能分析和特征可视化。调用了_forward_once方法来执行单次前向传播。 -
_forward_once(self, x, profile=False, visualize=False): 单次前向传播过程。遍历模型中的每一层,根据保存输出的层索引记录下需要的特征。如果设置了profile参数,则调用_profile_one_layer方法进行性能分析。如果设置了visualize参数,则调用feature_visualization方法进行特征可视化。 -
_profile_one_layer(self, m, x, dt): 对单个模块进行性能分析。计算模块的 FLOPs(浮点运算量)和运行时间,并输出日志信息。 -
fuse(self): 将模型中的Conv2d()和BatchNorm2d()层融合为单个层。通过遍历模型中的每个模块,对满足条件的模块进行融合操作,并更新模型结构。 -
info(self, verbose=False, img_size=640): 打印模型的相关信息。调用了model_info方法来输出模型的结构、参数数量等信息。 -
_apply(self, fn): 应用给定的函数到模型的张量上,例如to(),cpu(),cuda(),half()。在这个方法中,除了将函数应用到模型的张量参数上之外,还更新了Detect或Segment类型模块中的一些属性,如stride、grid和anchor_grid。
DetectionModel类
class DetectionModel(BaseModel):
    # YOLOv5 detection model
    def __init__(self, cfg='yolov5s.yaml', ch=3, nc=None, anchors=None):  # model, input channels, number of classes
        super().__init__()
        if isinstance(cfg, dict):
            self.yaml = cfg  # model dict
        else:  # is *.yaml
            import yaml  # for torch hub
            self.yaml_file = Path(cfg).name
            with open(cfg, encoding='ascii', errors='ignore') as f:
                self.yaml = yaml.safe_load(f)  # model dict

        # Define model
        ch = self.yaml['ch'] = self.yaml.get('ch', ch)  # input channels
        if nc and nc != self.yaml['nc']:
            LOGGER.info(f"Overriding model.yaml nc={self.yaml['nc']} with nc={nc}")
            self.yaml['nc'] = nc  # override yaml value
        if anchors:
            LOGGER.info(f'Overriding model.yaml anchors with anchors={anchors}')
            self.yaml['anchors'] = round(anchors)  # override yaml value
        self.model, self.save = parse_model(deepcopy(self.yaml), ch=[ch])  # model, savelist
        self.names = [str(i) for i in range(self.yaml['nc'])]  # default names
        self.inplace = self.yaml.get('inplace', True)

        # Build strides, anchors
        m = self.model[-1]  # Detect()
        if isinstance(m, (Detect, Segment)):
            s = 256  # 2x min stride
            m.inplace = self.inplace
            forward = lambda x: self.forward(x)[0] if isinstance(m, Segment) else self.forward(x)
            m.stride = torch.tensor([s / x.shape[-2] for x in forward(torch.zeros(1, ch, s, s))])  # forward
            check_anchor_order(m)
            m.anchors /= m.stride.view(-1, 1, 1)
            self.stride = m.stride
            self._initialize_biases()  # only run once

        # Init weights, biases
        initialize_weights(self)
        self.info()
        LOGGER.info('')

    def forward(self, x, augment=False, profile=False, visualize=False):
        if augment:
            return self._forward_augment(x)  # augmented inference, None
        return self._forward_once(x, profile, visualize)  # single-scale inference, train

    def _forward_augment(self, x):
        img_size = x.shape[-2:]  # height, width
        s = [1, 0.83, 0.67]  # scales
        f = [None, 3, None]  # flips (2-ud, 3-lr)
        y = []  # outputs
        for si, fi in zip(s, f):
            xi = scale_img(x.flip(fi) if fi else x, si, gs=int(self.stride.max()))
            yi = self._forward_once(xi)[0]  # forward
            # cv2.imwrite(f'img_{si}.jpg', 255 * xi[0].cpu().numpy().transpose((1, 2, 0))[:, :, ::-1])  # save
            yi = self._descale_pred(yi, fi, si, img_size)
            y.append(yi)
        y = self._clip_augmented(y)  # clip augmented tails
        return torch.cat(y, 1), None  # augmented inference, train

    def _descale_pred(self, p, flips, scale, img_size):
        # de-scale predictions following augmented inference (inverse operation)
        if self.inplace:
            p[..., :4] /= scale  # de-scale
            if flips == 2:
                p[..., 1] = img_size[0] - p[..., 1]  # de-flip ud
            elif flips == 3:
                p[..., 0] = img_size[1] - p[..., 0]  # de-flip lr
        else:
            x, y, wh = p[..., 0:1] / scale, p[..., 1:2] / scale, p[..., 2:4] / scale  # de-scale
            if flips == 2:
                y = img_size[0] - y  # de-flip ud
            elif flips == 3:
                x = img_size[1] - x  # de-flip lr
            p = torch.cat((x, y, wh, p[..., 4:]), -1)
        return p

    def _clip_augmented(self, y):
        # Clip YOLOv5 augmented inference tails
        nl = self.model[-1].nl  # number of detection layers (P3-P5)
        g = sum(4 ** x for x in range(nl))  # grid points
        e = 1  # exclude layer count
        i = (y[0].shape[1] // g) * sum(4 ** x for x in range(e))  # indices
        y[0] = y[0][:, :-i]  # large
        i = (y[-1].shape[1] // g) * sum(4 ** (nl - 1 - x) for x in range(e))  # indices
        y[-1] = y[-1][:, i:]  # small
        return y

    def _initialize_biases(self, cf=None):  # initialize biases into Detect(), cf is class frequency
        # https://arxiv.org/abs/1708.02002 section 3.3
        # cf = torch.bincount(torch.tensor(np.concatenate(dataset.labels, 0)[:, 0]).long(), minlength=nc) + 1.
        m = self.model[-1]  # Detect() module
        for mi, s in zip(m.m, m.stride):  # from
            b = mi.bias.view(m.na, -1)  # conv.bias(255) to (3,85)
            b.data[:, 4] += math.log(8 / (640 / s) ** 2)  # obj (8 objects per 640 image)
            b.data[:, 5:5 + m.nc] += math.log(0.6 / (m.nc - 0.99999)) if cf is None else torch.log(cf / cf.sum())  # cls
            mi.bias = torch.nn.Parameter(b.view(-1), requires_grad=True)


Model = DetectionModel  # retain YOLOv5 'Model' class for backwards compatibility
DetectionModel 类是基于 BaseModel 类构建的,用于实现 YOLOv5 目标检测模型。它继承了 BaseModel 类的一些方法,并根据 YOLOv5 模型的配置文件初始化模型。
-
__init__(self, cfg='yolov5s.yaml', ch=3, nc=None, anchors=None): 初始化方法,接收模型的配置文件路径cfg、输入通道数ch、类别数nc和 anchors。首先根据配置文件初始化模型,然后根据传入的参数进行相应的修改,如修改输入通道数、类别数或 anchors。接着构建模型,解析配置文件并初始化模型的权重。最后打印模型的信息。 -
forward(self, x, augment=False, profile=False, visualize=False): 模型的前向传播方法。如果设置了augment参数,则执行增强推断,即对输入图像进行尺度变换和翻转操作,然后进行单次前向传播。如果未设置augment参数,则执行单次前向传播。根据参数profile和visualize的设置,选择是否进行性能分析和特征可视化。 -
_forward_augment(self, x): 执行增强推断的方法。根据预设的尺度因子和翻转方式,对输入图像进行处理,然后进行单次前向传播。最后对预测结果进行逆操作,将结果还原到原始图像尺寸。 -
_descale_pred(self, p, flips, scale, img_size): 对增强推断得到的预测结果进行逆操作,将预测框的坐标还原到原始图像尺寸。 -
_clip_augmented(self, y): 对增强推断得到的预测结果进行裁剪,去除多余的预测框。 -
_initialize_biases(self, cf=None): 初始化模型中的偏置项。根据目标检测中的一些规则,调整偏置项的值以适应目标检测任务。
二、修改部分
1、common.py
在C3类下增加C2类: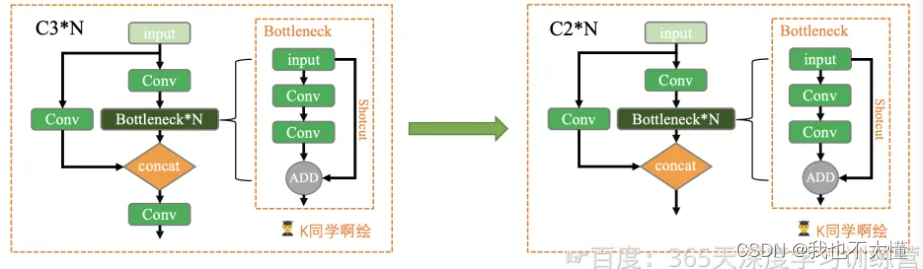
class C2(nn.Module):
    # CSP Bottleneck with 3 convolutions
    def __init__(self, c1, c2, n=1, shortcut=True, g=1, e=0.5):  # ch_in, ch_out, number, shortcut, groups, expansion
        super().__init__()
        c_ = int(c2 * e)  # hidden channels
        self.cv1 = Conv(c1, c_, 1, 1)
        self.cv2 = Conv(c1, c_, 1, 1)

        self.m = nn.Sequential(*(Bottleneck(c_, c_, shortcut, g, e=1.0) for _ in range(n)))

    def forward(self, x):
        #return self.cv3(torch.cat((self.m(self.cv1(x)), self.cv2(x)), 1))
        return torch.cat((self.m(self.cv1(x)), self.cv2(x)), 1)
2、yolov5s.yaml文件修改
注意将Y3周时修改的两个C3改回。
增加C2
backbone:
  # [from, number, module, args]
  [[-1, 1, Conv, [64, 6, 2, 2]],  # 0-P1/2
   [-1, 1, Conv, [128, 3, 2]],  # 1-P2/4
   [-1, 3, C3, [128]],
   [-1, 3, C2, [128]]
   [-1, 1, Conv, [256, 3, 2]],  # 3-P3/8
   [-1, 6, C3, [256]],          # 4
   [-1, 1, Conv, [512, 3, 2]],  # 5-P4/16
   [-1, 9, C3, [512]],          #6
   [-1, 1, Conv, [1024, 3, 2]],  # 7-P5/32
   [-1, 3, C3, [1024]],
   [-1, 1, SPPF, [1024, 5]],  # 9
  ]
3、yolo.py修改
parse_model函数部分修改(添加C2)
        if m in {
                Conv, GhostConv, Bottleneck, GhostBottleneck, SPP, SPPF, DWConv, MixConv2d, Focus, CrossConv,
                BottleneckCSP, C3, C2, C3TR, C3SPP, C3Ghost, nn.ConvTranspose2d, DWConvTranspose2d, C3x}:
            c1, c2 = ch[f], args[0]
            if c2 != no:  # if not output
                c2 = make_divisible(c2 * gw, 8)

            args = [c1, c2, *args[1:]]
            if m in {BottleneckCSP, C3, C2, C3TR, C3Ghost, C3x}:
                args.insert(2, n)  # number of repeats
                n = 1