1 环境:
CPU:i5-12500
Python:3.8.18
2 安装Openvino和ONNXRuntime
2.1 Openvino简介
Openvino是由Intel开发的专门用于优化和部署人工智能推理的半开源的工具包,主要用于对深度推理做优化。
Openvino内部集成了Opencv、TensorFlow模块,除此之外它还具有强大的Plugin开发框架,允许开发者在Openvino之上对推理过程做优化。
Openvino整体框架为:Openvino前端→ Plugin中间层→ Backend后端
Openvino的优点在于它屏蔽了后端接口,提供了统一操作的前端API,开发者可以无需关心后端的实现,例如后端可以是TensorFlow、Keras、ARM-NN,通过Plugin提供给前端接口调用,也就意味着一套代码在Openvino之上可以运行在多个推理引擎之上,Openvino像是类似聚合一样的开发包。
2.2 ONNXRuntime简介
ONNXRuntime是微软推出的一款推理框架,用户可以非常便利的用其运行一个onnx模型。ONNXRuntime支持多种运行后端包括CPU,GPU,TensorRT,DML等。可以说ONNXRuntime是对ONNX模型最原生的支持。
虽然大家用ONNX时更多的是作为一个中间表示,从pytorch转到onnx后直接喂到TensorRT或MNN等各种后端框架,但这并不能否认ONNXRuntime是一款非常优秀的推理框架。而且由于其自身只包含推理功能(最新的ONNXRuntime甚至已经可以训练),通过阅读其源码可以解深度学习框架的一些核心功能原理(op注册,内存管理,运行逻辑等)
总体来看,整个ONNXRuntime的运行可以分为三个阶段,Session构造,模型加载与初始化和运行。和其他所有主流框架相同,ONNXRuntime最常用的语言是python,而实际负责执行框架运行的则是C++。
2.3 安装
pip install openvino -i  https://pypi.tuna.tsinghua.edu.cn/simple
pip install onnxruntime -i  https://pypi.tuna.tsinghua.edu.cn/simple
YOLOv8_22">3 YOLOv8介绍
略
4 基于Openvino和ONNXRuntime推理
略
4.1 全部代码
import argparse
import time
import cv2
import numpy as np
from openvino.runtime import Core  # pip install openvino -i  https://pypi.tuna.tsinghua.edu.cn/simple
import onnxruntime as ort  # 使用onnxruntime推理用上,pip install onnxruntime,默认安装CPU


# Pose默认的person类
CLASSES = ['person']

class OpenvinoInference(object):
    def __init__(self, onnx_path):
        self.onnx_path = onnx_path
        ie = Core()
        self.model_onnx = ie.read_model(model=self.onnx_path)
        self.compiled_model_onnx = ie.compile_model(model=self.model_onnx, device_name="CPU")
        self.output_layer_onnx = self.compiled_model_onnx.output(0)

    def predict(self, datas):
        predict_data = self.compiled_model_onnx([datas])[self.output_layer_onnx]
        return predict_data


class KeyPoint_draw(object):
    def __init__(self):
        # 定义一个调色板数组,其中每个元素是一个包含RGB值的列表,用于表示不同的颜色
        self.palette = np.array([[255, 128, 0], [255, 153, 51], [255, 178, 102],
                                [230, 230, 0], [255, 153, 255], [153, 204, 255],
                                [255, 102, 255], [255, 51, 255], [102, 178, 255],
                                [51, 153, 255], [255, 153, 153], [255, 102, 102],
                                [255, 51, 51], [153, 255, 153], [102, 255, 102],
                                [51, 255, 51], [0, 255, 0], [0, 0, 255], [255, 0, 0],
                                [255, 255, 255]])
        # 定义人体17个关键点的连接顺序,每个子列表包含两个数字,代表要连接的关键点的索引, 1鼻子 2左眼 3右眼 4左耳 5右耳 6左肩 7右肩
        # 8左肘 9右肘 10左手腕 11右手腕 12左髋 13右髋 14左膝 15右膝 16左踝 17右踝
        self.skeleton = [[16, 14], [14, 12], [17, 15], [15, 13], [12, 13], [6, 12],
                        [7, 13], [6, 7], [6, 8], [7, 9], [8, 10], [9, 11], [2, 3],
                        [1, 2], [1, 3], [2, 4], [3, 5], [4, 6], [5, 7]]
        # 通过索引从调色板中选择颜色,用于绘制人体骨架的线条,每个索引对应一种颜色
        self.pose_limb_color = self.palette[[9, 9, 9, 9, 7, 7, 7, 0, 0, 0, 0, 0, 16, 16, 16, 16, 16, 16, 16]]
        # 通过索引从调色板中选择颜色,用于绘制人体的关键点,每个索引对应一种颜色
        self.pose_kpt_color = self.palette[[16, 16, 16, 16, 16, 0, 0, 0, 0, 0, 0, 9, 9, 9, 9, 9, 9]]

    def plot_skeleton_kpts(self, im, kpts, steps=3):
        num_kpts = len(kpts) // steps  # 51 / 3 =17
        # 画点
        for kid in range(num_kpts):
            r, g, b = self.pose_kpt_color[kid]
            x_coord, y_coord = kpts[steps * kid], kpts[steps * kid + 1]
            conf = kpts[steps * kid + 2]
            if conf > 0.5:  # 关键点的置信度必须大于 0.5
                cv2.circle(im, (int(x_coord), int(y_coord)), 10, (int(r), int(g), int(b)), -1)
        # 画骨架
        for sk_id, sk in enumerate(self.skeleton):
            r, g, b = self.pose_limb_color[sk_id]
            pos1 = (int(kpts[(sk[0] - 1) * steps]), int(kpts[(sk[0] - 1) * steps + 1]))
            pos2 = (int(kpts[(sk[1] - 1) * steps]), int(kpts[(sk[1] - 1) * steps + 1]))
            conf1 = kpts[(sk[0] - 1) * steps + 2]
            conf2 = kpts[(sk[1] - 1) * steps + 2]
            if conf1 > 0.5 and conf2 > 0.5:  # 对于肢体,相连的两个关键点置信度 必须同时大于 0.5
                cv2.line(im, pos1, pos2, (int(r), int(g), int(b)), thickness=2)


class YOLOv8_pose:
    """YOLOv8_pose detection model class for handling inference and visualization."""

    def __init__(self, onnx_model, imgsz=(640, 640), infer_tool='openvino'):
        """
        Initialization.

        Args:
            onnx_model (str): Path to the ONNX model.
        """
        self.infer_tool = infer_tool
        if self.infer_tool == 'openvino':
            # 构建openvino推理引擎
            self.openvino = OpenvinoInference(onnx_model)
            self.ndtype = np.single
        else:
            # 构建onnxruntime推理引擎
            self.ort_session = ort.InferenceSession(onnx_model,
                                                providers=['CUDAExecutionProvider', 'CPUExecutionProvider']
                                                if ort.get_device() == 'GPU' else ['CPUExecutionProvider'])

            # Numpy dtype: support both FP32 and FP16 onnx model
            self.ndtype = np.half if self.ort_session.get_inputs()[0].type == 'tensor(float16)' else np.single

        self.classes = CLASSES  # 加载模型类别
        self.model_height, self.model_width = imgsz[0], imgsz[1]  # 图像resize大小
        self.color = (0, 0, 255)  # 为类别生成调色板

    def __call__(self, im0, conf_threshold=0.4, iou_threshold=0.45):
        """
        The whole pipeline: pre-process -> inference -> post-process.

        Args:
            im0 (Numpy.ndarray): original input image.
            conf_threshold (float): confidence threshold for filtering predictions.
            iou_threshold (float): iou threshold for NMS.

        Returns:
            boxes (List): list of bounding boxes.
        """
        # 前处理Pre-process
        t1 = time.time()
        im, ratio, (pad_w, pad_h) = self.preprocess(im0)
        print('预处理时间:{:.3f}s'.format(time.time() - t1))

        # 推理 inference
        t2 = time.time()
        if self.infer_tool == 'openvino':
            preds = self.openvino.predict(im)
        else:
            preds = self.ort_session.run(None, {self.ort_session.get_inputs()[0].name: im})[0]
        print('推理时间:{:.2f}s'.format(time.time() - t2))

        # 后处理Post-process
        t3 = time.time()
        boxes = self.postprocess(preds,
                                im0=im0,
                                ratio=ratio,
                                pad_w=pad_w,
                                pad_h=pad_h,
                                conf_threshold=conf_threshold,
                                iou_threshold=iou_threshold,
                                )
        print('后处理时间:{:.3f}s'.format(time.time() - t3))

        return boxes

    # 前处理,包括:resize, pad, HWC to CHW,BGR to RGB,归一化,增加维度CHW -> BCHW
    def preprocess(self, img):
        """
        Pre-processes the input image.

        Args:
            img (Numpy.ndarray): image about to be processed.

        Returns:
            img_process (Numpy.ndarray): image preprocessed for inference.
            ratio (tuple): width, height ratios in letterbox.
            pad_w (float): width padding in letterbox.
            pad_h (float): height padding in letterbox.
        """
        # Resize and pad input image using letterbox() (Borrowed from Ultralytics)
        shape = img.shape[:2]  # original image shape
        new_shape = (self.model_height, self.model_width)
        r = min(new_shape[0] / shape[0], new_shape[1] / shape[1])
        ratio = r, r
        new_unpad = int(round(shape[1] * r)), int(round(shape[0] * r))
        pad_w, pad_h = (new_shape[1] - new_unpad[0]) / 2, (new_shape[0] - new_unpad[1]) / 2  # wh padding
        if shape[::-1] != new_unpad:  # resize
            img = cv2.resize(img, new_unpad, interpolation=cv2.INTER_LINEAR)
        top, bottom = int(round(pad_h - 0.1)), int(round(pad_h + 0.1))
        left, right = int(round(pad_w - 0.1)), int(round(pad_w + 0.1))
        img = cv2.copyMakeBorder(img, top, bottom, left, right, cv2.BORDER_CONSTANT, value=(114, 114, 114))  # 填充

        # Transforms: HWC to CHW -> BGR to RGB -> div(255) -> contiguous -> add axis(optional)
        img = np.ascontiguousarray(np.einsum('HWC->CHW', img)[::-1], dtype=self.ndtype) / 255.0
        img_process = img[None] if len(img.shape) == 3 else img
        return img_process, ratio, (pad_w, pad_h)

    # 后处理,包括:阈值过滤与NMS
    def postprocess(self, preds, im0, ratio, pad_w, pad_h, conf_threshold, iou_threshold):
        """
        Post-process the prediction.

        Args:
            preds (Numpy.ndarray): predictions come from ort.session.run().
            im0 (Numpy.ndarray): [h, w, c] original input image.
            ratio (tuple): width, height ratios in letterbox.
            pad_w (float): width padding in letterbox.
            pad_h (float): height padding in letterbox.
            conf_threshold (float): conf threshold.
            iou_threshold (float): iou threshold.

        Returns:
            boxes (List): list of bounding boxes.
        """
        x = preds  # outputs: predictions (1, 56, 8400),其中56=4+1+17*3,17个关键点(x,y,visibility)
        # Transpose the first output: (Batch_size, xywh_conf_pose, Num_anchors) -> (Batch_size, Num_anchors, xywh_conf_pose)
        x = np.einsum('bcn->bnc', x)  # (1, 8400, 56)

        # Predictions filtering by conf-threshold
        x = x[x[..., 4] > conf_threshold]

        # Create a new matrix which merge these(box, score, pose) into one
        # For more details about `numpy.c_()`: https://numpy.org/doc/1.26/reference/generated/numpy.c_.html
        x = np.c_[x[..., :4], x[..., 4], x[..., 5:]]

        # NMS filtering
        # 经过NMS后的值, np.array([[x, y, w, h, conf, pose], ...]), shape=(-1, 4 + 1 + 17*3)
        x = x[cv2.dnn.NMSBoxes(x[:, :4], x[:, 4], conf_threshold, iou_threshold)]

        # 重新缩放边界框,为画图做准备
        if len(x) > 0:
            # Bounding boxes format change: cxcywh -> xyxy
            x[..., [0, 1]] -= x[..., [2, 3]] / 2
            x[..., [2, 3]] += x[..., [0, 1]]

            # Rescales bounding boxes from model shape(model_height, model_width) to the shape of original image
            x[..., :4] -= [pad_w, pad_h, pad_w, pad_h]
            x[..., :4] /= min(ratio)

            # Bounding boxes boundary clamp
            x[..., [0, 2]] = x[:, [0, 2]].clip(0, im0.shape[1])  # clip避免边界框超出图像边界
            x[..., [1, 3]] = x[:, [1, 3]].clip(0, im0.shape[0])

            # 关键点坐标映射到原图上,从[:, 5:]开始算
            num_kpts = x.shape[1] // 3  # 56 // 3 = 18
            for kid in range(2, num_kpts + 1):
                x[:, kid * 3 - 1] = (x[:, kid * 3 - 1] - pad_w) / min(ratio)
                x[:, kid * 3] = (x[:, kid * 3] - pad_h) / min(ratio)

            return x
        else:
            return []

    # 绘框
    def draw_and_visualize(self, im, bboxes, keypoint_draw, vis=False, save=True):
        """
        Draw and visualize results.

        Args:
            im (np.ndarray): original image, shape [h, w, c].
            bboxes (numpy.ndarray): [n, 56], n is number of bboxes.
            vis (bool): imshow using OpenCV.
            save (bool): save image annotated.

        Returns:
            None
        """

        # Draw rectangles
        for bbox in bboxes:
            box, conf, kpts = bbox[:4], bbox[4], bbox[5:]
            # draw bbox rectangle
            cv2.rectangle(im, (int(box[0]), int(box[1])), (int(box[2]), int(box[3])),
                          self.color, 1, cv2.LINE_AA)
            cv2.putText(im, f'{self.classes[0]}: {conf:.3f}', (int(box[0]), int(box[1] - 9)),
                        cv2.FONT_HERSHEY_SIMPLEX, 0.7, self.color, 2, cv2.LINE_AA)

            # 画关键点,连线
            keypoint_draw.plot_skeleton_kpts(im, kpts)

        # Show image
        if vis:
            cv2.imshow('demo', im)
            cv2.waitKey(0)
            cv2.destroyAllWindows()

        # Save image
        if save:
            cv2.imwrite('demo.jpg', im)


if __name__ == '__main__':
    # Create an argument parser to handle command-line arguments
    parser = argparse.ArgumentParser()
    parser.add_argument('--model', type=str, default='weights/yolov8s-pose.onnx', help='Path to ONNX model')
    parser.add_argument('--source', type=str, default=str('bus.jpg'), help='Path to input image')
    parser.add_argument('--imgsz', type=tuple, default=(640, 640), help='Image input size')
    parser.add_argument('--conf', type=float, default=0.25, help='Confidence threshold')
    parser.add_argument('--iou', type=float, default=0.45, help='NMS IoU threshold')
    parser.add_argument('--infer_tool', type=str, default='openvino', choices=("openvino", "onnxruntime"), help='选择推理引擎')
    args = parser.parse_args()

    # Build model
    model = YOLOv8_pose(args.model, args.imgsz, args.infer_tool)
    keypoint_draw = KeyPoint_draw()  # 可视化关键点

    # Read image by OpenCV
    img = cv2.imread(args.source)

    # Inference
    boxes = model(img, conf_threshold=args.conf, iou_threshold=args.iou)

    # Visualize
    if len(boxes) > 0:
        model.draw_and_visualize(img, boxes, keypoint_draw, vis=False, save=True)
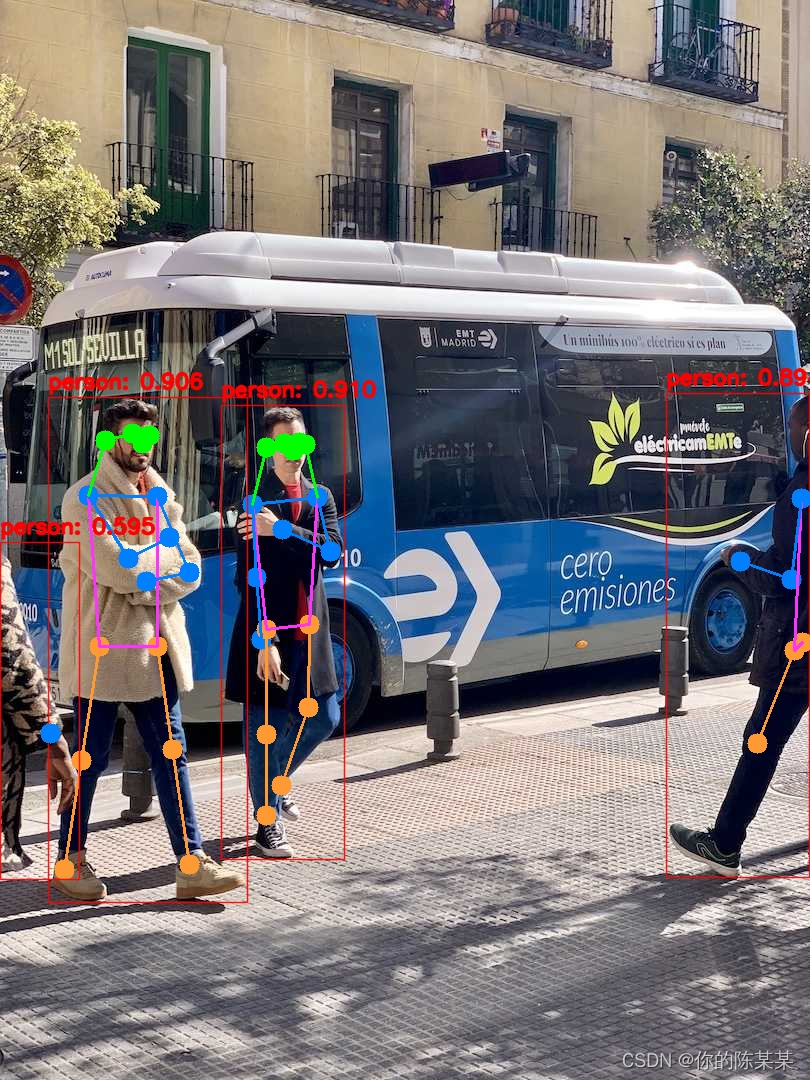
具体时间消耗:
预处理时间:0.005s(包含Pad)
推理时间:0.10s(Openvino)
推理时间:0.11s(ONNXRuntime)
后处理时间:0.001s
注:640×640下。