系列文章目录
第一章 YOLOv5模型训练集标注、训练流程
第二章 YOLOv5模型转ONNX,ONNX转TensorRT Engine
第三章 TensorRT量化
文章目录
- 系列文章目录
- 前言
- 一、yolov5模型导出ONNX
- 1.1 工作机制
- 1.2 修改yolov5代码,输出ONNX
- 二、TensorRT部署
- 2.1 模型部署
- 2.2 模型推理
- 总结
前言
学习笔记–恩培老师
一、yolov5模型导出ONNX
1.1 工作机制
使用tensort deconde plugin 来替代yolov5代码中的deconde操作,需要修改yolov5代码导出onnx模型的部分。
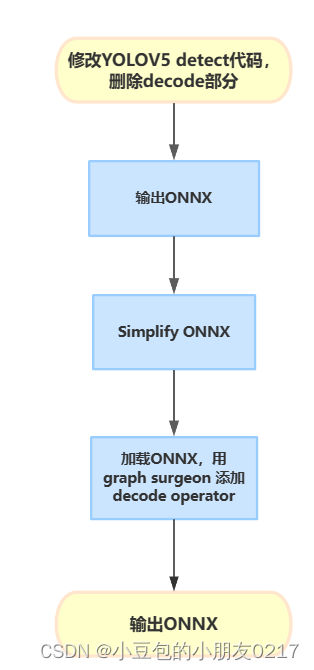
1.2 修改yolov5代码,输出ONNX
批量修改
#将patch复制到yolov5文件夹
cp export.patch yolov5/
#进入yolov5文件夹
cd yolov5/
#应用patch
git am export.patch
安装需要依赖
pip install seaborn
pip install onnx-graphsurgeon
pip install opencv-python==4.5.5.64
pip install onnx-simplifier==0.3.10

apt update
apt install -y libgl1-mesa-glx
安装完成后,准备训练好的模型文件,默认为yolov5s.pt,然后执行下列代码,生成Onnx文件。
安装不上onnx-graphsurgeon,使用下面的命令再次安装
pip install nvidia-pyindex
pip install onnx-graphsurgeon
python export.py --weights weights/yolov5s_person.pt --include onnx --simplify
这里的yolov5s_person.pt文件就是我们刚刚训练好的best.pt复制过来的。
可视化模型工具
pip install netron
netron ./weights/yolov5s_person.onnx
二、TensorRT部署
使用TensorRT docker容器:
docker run --gpus all -it --name env_trt -v ${pwd}: /app nvcr.io/nvidia/tensorrt:22.08-py3
2.1 模型部署
推荐博客TensorRT部署流程
yolov5转到onnx后进行模型的构建并保存序列化后的模型为文件。
- 模型导出成 ONNX 格式。
- 把 ONNX 格式模型输入给 TensorRT,并指定优化参数。
- 使用 TensorRT 优化得到 TensorRT Engine。
- 使用 TensorRT Engine 进行 inference。
- 创建builder
这里使用了std::unqique_ptr,只能指针包装我们的builder,实现自动管理指针生命周期。
//**************1.创建builder***************//

auto builder = std::unique_ptr<nvinferl::IBuilder>
(nvinfer1::IBuilder::createInferBuilder(sampelr::gLogger.getTRTLogger())));
if (!builder)
{
    std::cerr<<"Failed to create builder"<<std::endl;
    return -1;
}
-
创建网络。这里指定了explicitBatch
-
创建onnxparser,用于解析onnx文件
4.配置网络参数。
我们需要告诉tensorrt我们最终运行时,输入图像的范围,batch size范围。
#include <iostream>
#include "NvInfer.h"

int main() {
    // Create a logger
    nvinfer1::ILogger* logger = new nvinfer1::ILogger();

    // Create a builder
    nvinfer1::IBuilder* builder = nvinfer1::createInferBuilder(*logger);
    if (!builder) {
        std::cerr << "Failed to create builder" << std::endl;
        return -1;
    }

    // Set up builder configurations (optional)
    builder->setMaxBatchSize(1);
    builder->setMaxWorkspaceSize(1 << 30); // 1GB

    // Create a network definition
    nvinfer1::INetworkDefinition* network = builder->createNetworkV2(0U);

    // ... Add layers and define the network ...

    // Build the engine
    nvinfer1::ICudaEngine* engine = builder->buildCudaEngine(*network);

    if (!engine) {
        std::cerr << "Failed to build engine" << std::endl;
        return -1;
    }

    // Clean up
    network->destroy();
    engine->destroy();
    builder->destroy();
    logger->log(nvinfer1::ILogger::Severity::kINFO, "Finished successfully!");

    delete logger;

    return 0;
}
2.2 模型推理
推理过程
- 读取模型文件
- 对输入进行预处理
- 读取模型输出
- 后处理(NMS)
1.创建运行时
2.反序列化模型得到推理Engine
3.创建执行上下文
4.创建输入输出缓冲区管理器
5.读取视频文件,并逐帧读取图像送入模型,进行推理
#include <iostream>
#include <fstream>
#include <string>
#include <sstream>
#include <chrono>
#include <opencv2/opencv.hpp>
#include "NvInfer.h"

int main() {
    // Create a logger
    nvinfer1::ILogger* logger = new nvinfer1::ILogger();

    // Create a runtime
    nvinfer1::IRuntime* runtime = nvinfer1::createInferRuntime(*logger);
    if (!runtime) {
        std::cerr << "Failed to create runtime" << std::endl;
        return -1;
    }

    // Deserialize the engine
    const std::string engineFilePath = "path/to/your/engine.plan";
    std::ifstream engineFile(engineFilePath, std::ios::binary);
    if (!engineFile) {
        std::cerr << "Failed to open engine file" << std::endl;
        return -1;
    }
    engineFile.seekg(0, engineFile.end);
    const int engineSize = engineFile.tellg();
    engineFile.seekg(0, engineFile.beg);
    char* engineData = new char[engineSize];
    engineFile.read(engineData, engineSize);
    engineFile.close();

    nvinfer1::ICudaEngine* engine = runtime->deserializeCudaEngine(engineData, engineSize, nullptr);
    if (!engine) {
        std::cerr << "Failed to deserialize engine" << std::endl;
        return -1;
    }

    delete[] engineData;

    // Create an execution context
    nvinfer1::IExecutionContext* context = engine->createExecutionContext();
    if (!context) {
        std::cerr << "Failed to create execution context" << std::endl;
        return -1;
    }

    // Create input and output buffer managers
    const int maxBatchSize = engine->getMaxBatchSize();
    nvinfer1::Dims inputDims = engine->getBindingDimensions(0);
    const int inputSize = inputDims.d[1] * inputDims.d[2] * inputDims.d[3];
    nvinfer1::Dims outputDims = engine->getBindingDimensions(1);
    const int outputSize = outputDims.d[1];

    nvinfer1::IHostMemory* inputMemory = engine->createHostMemory(engine->getBindingDataType(0), maxBatchSize * inputSize);
    void* inputBuffer = inputMemory->data();

    nvinfer1::IHostMemory* outputMemory = engine->createHostMemory(engine->getBindingDataType(1), maxBatchSize * outputSize);
    void* outputBuffer = outputMemory->data();

    // Open the video file
    const std::string videoFilePath = "path/to/your/video.mp4";
    cv::VideoCapture cap(videoFilePath);
    if (!cap.isOpened()) {
        std::cerr << "Failed to open video file" << std::endl;
        return -1;
    }

    // Loop through all frames
    cv::Mat frame;
    int frameCount = 0;
    auto startTime = std::chrono::high_resolution_clock::now();

    while (true) {
        // Read the next frame
        cap >> frame;
        if (frame.empty()) {
            break;
        }

        // Prepare the input data
        cv::Mat resizedFrame;
        cv::resize(frame, resizedFrame, cv::Size(inputDims.d[3], inputDims.d[2]));
        float* inputData = static_cast<float*>(inputBuffer) + frameCount * inputSize;

        const int channelSize = inputDims.d[2] * inputDims.d[3];
        for (int c = 0; c < inputDims.d[1]; ++c) {
            for (int h = 0; h < inputDims.d[2]; ++h) {
                for (int w = 0; w < inputDims.d[3]; ++w) {
                    const float pixel = resizedFrame.at<cv::Vec3b>(h, w)[c] / 255.0f;
                    inputData[c * channelSize + h * inputDims.d[3] + w] = pixel;
                }
            }
        }

        // Run inference
        context->executeV2(&inputBuffer, &outputBuffer);

        // Process the output data
        float* outputData = static_cast<float*>(outputBuffer) + frameCount * outputSize;

        // ... Process the output data ...

        ++frameCount;
    }

    // Measure and print the inference time
    auto endTime = std::chrono::high_resolution_clock::now();
    auto elapsedTime = std::chrono::duration_cast<std::chrono::milliseconds>(endTime - startTime);
    std::cout << "Inference time: " << elapsedTime.count() << "ms" << std::endl;

    // Clean up
    inputMemory->destroy();
    outputMemory->destroy();
    context->destroy();
    engine->destroy();
    runtime->destroy();
    logger->log(nvinfer1::ILogger::Severity::kINFO, "Finished successfully!");

    delete logger;

    return 0;
}
使用cmake进行构建,cmake相关知识可看cmake学习笔记
cmake -S .-B build
cmake --build build
./build/build
./build/build ./weights/yolo5s_person.onnx
#执行推理
./build/runtime
视频文件
./weights/yolov5.engine ./media/c3.mp4
总结
接下来是了解TensorRT插件,Int8量化流程。
推荐视频链接:https://www.bilibili.com/video/BV1jj411Z7wG/?spm_id_from=333.337.search-card.all.click&vd_source=ce674108fa2e19e5322d710724193487
推荐链接:https://github.com/NVIDIA/trt-samples-for-hackathon-cn/tree/master/cookbook


![白学的小知识[css3轮播]](/images/no-images.jpg)