🚀🚀🚀手把手教程:教会你如何使用自己的数据集开展分割任务
🚀🚀🚀YOLOv8-seg创新专栏:http://t.csdnimg.cn/KLSdv
学姐带你学习YOLOv8,从入门到创新,轻轻松松搞定科研;
1)手把手教你如何训练YOLOv8-seg;
2)模型创新,提升分割性能;
3)独家自研模块助力分割;

1.数据集介绍
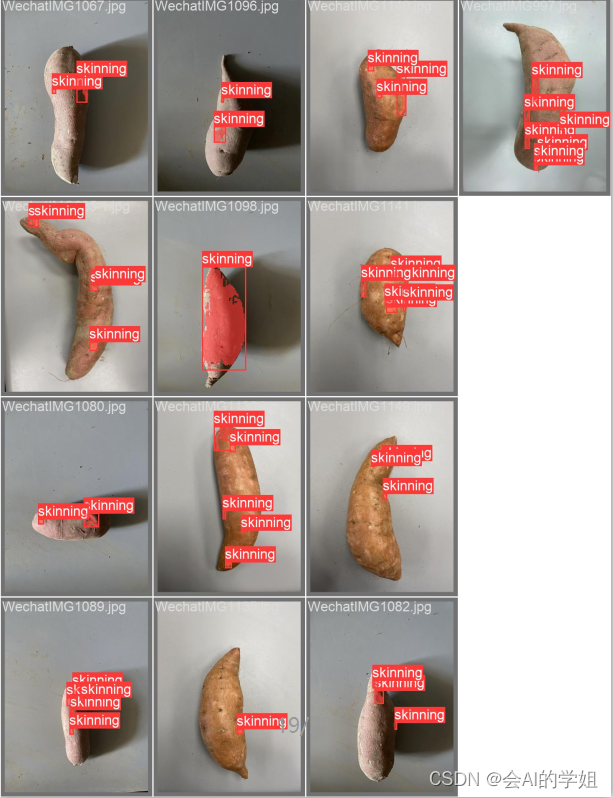
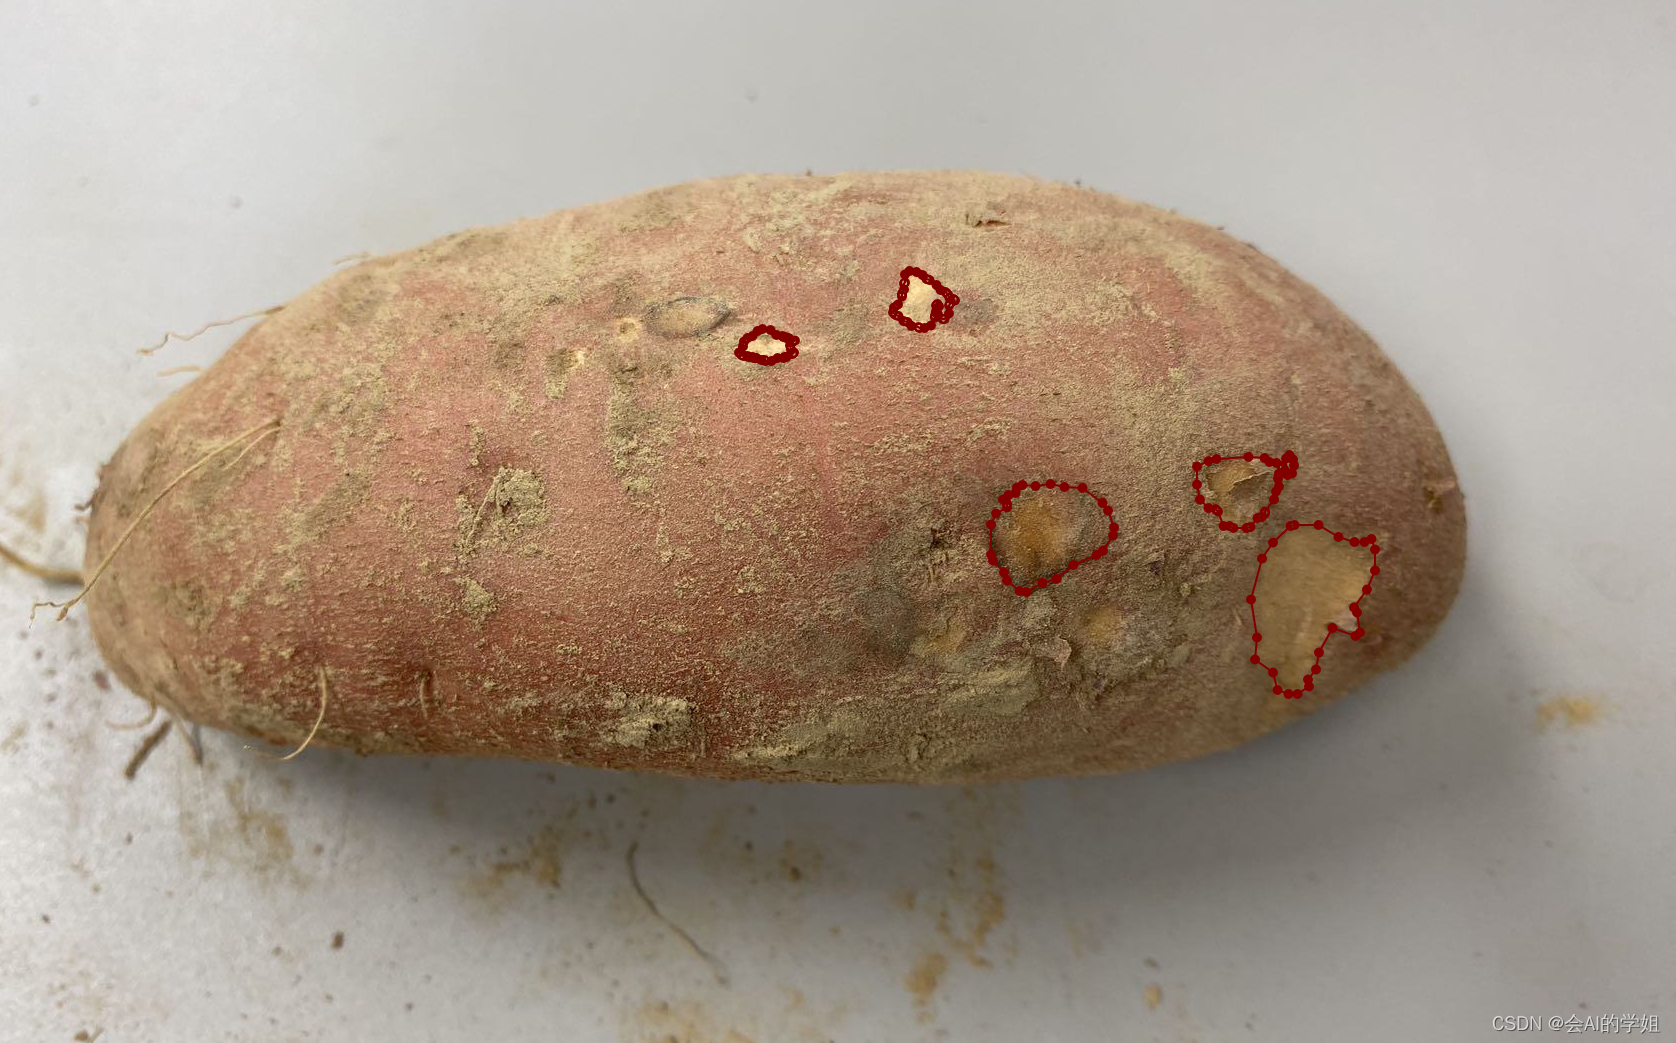
番薯破损分割任务,自己手动标注,数据集大小304张
1.数据集标注
使用labelme进行数据集标注,首先进行labelme安装
pip install labelme
 2.数据集格式转换
json to txt以及 划分为train、val、test,适配yolov8-seg
2.1 json2txt.py
# -*- coding: utf-8 -*-
import json
import os
import argparse
from tqdm import tqdm


def convert_label_json(json_dir, save_dir, classes):
    json_paths = os.listdir(json_dir)
    classes = classes.split(',')

    for json_path in tqdm(json_paths):
        # for json_path in json_paths:
        path = os.path.join(json_dir, json_path)
        with open(path, 'r') as load_f:
            json_dict = json.load(load_f)
        h, w = json_dict['imageHeight'], json_dict['imageWidth']

        # save txt path
        txt_path = os.path.join(save_dir, json_path.replace('json', 'txt'))
        txt_file = open(txt_path, 'w')

        for shape_dict in json_dict['shapes']:
            label = shape_dict['label']
            label_index = classes.index(label)
            points = shape_dict['points']

            points_nor_list = []

            for point in points:
                points_nor_list.append(point[0] / w)
                points_nor_list.append(point[1] / h)

            points_nor_list = list(map(lambda x: str(x), points_nor_list))
            points_nor_str = ' '.join(points_nor_list)

            label_str = str(label_index) + ' ' + points_nor_str + '\n'
            txt_file.writelines(label_str)


if __name__ == "__main__":
    """
    python json2txt_nomalize.py --json-dir my_datasets/color_rings/jsons --save-dir my_datasets/color_rings/txts --classes "cat,dogs"
    """
    parser = argparse.ArgumentParser(description='json convert to txt params')
    parser.add_argument('--json-dir', type=str,default='F:/DL/Pytorch/yolov8/ultralytics-seg/data/skinning/json', help='json path dir')
    parser.add_argument('--save-dir', type=str,default='F:/DL/Pytorch/yolov8/ultralytics-seg/data/skinning/txt' ,help='txt save dir')
    parser.add_argument('--classes', type=str, default='skinning',help='classes')
    args = parser.parse_args()
    json_dir = args.json_dir
    save_dir = args.save_dir
    classes = args.classes
    convert_label_json(json_dir, save_dir, classes)
2.2 划分为train、val、test
# 将图片和标注数据按比例切分为 训练集和测试集
import shutil
import random
import os
import argparse


# 检查文件夹是否存在
def mkdir(path):
    if not os.path.exists(path):
        os.makedirs(path)

def main(image_dir, txt_dir, save_dir):
    # 创建文件夹
    mkdir(save_dir)
    images_dir = os.path.join(save_dir, 'images')
    labels_dir = os.path.join(save_dir, 'labels')

    img_train_path = os.path.join(images_dir, 'train')
    img_test_path = os.path.join(images_dir, 'test')
    img_val_path = os.path.join(images_dir, 'val')

    label_train_path = os.path.join(labels_dir, 'train')
    label_test_path = os.path.join(labels_dir, 'test')
    label_val_path = os.path.join(labels_dir, 'val')

    mkdir(images_dir);
    mkdir(labels_dir);
    mkdir(img_train_path);
    mkdir(img_test_path);
    mkdir(img_val_path);
    mkdir(label_train_path);
    mkdir(label_test_path);
    mkdir(label_val_path);

    # 数据集划分比例,训练集75%,验证集15%,测试集15%,按需修改
    train_percent = 0.85
    val_percent = 0.15
    test_percent = 0

    total_txt = os.listdir(txt_dir)
    num_txt = len(total_txt)
    list_all_txt = range(num_txt)  # 范围 range(0, num)

    num_train = int(num_txt * train_percent)
    num_val = int(num_txt * val_percent)
    num_test = num_txt - num_train - num_val

    train = random.sample(list_all_txt, num_train)
    # 在全部数据集中取出train
    val_test = [i for i in list_all_txt if not i in train]
    # 再从val_test取出num_val个元素,val_test剩下的元素就是test
    val = random.sample(val_test, num_val)

    print("训练集数目:{}, 验证集数目:{},测试集数目:{}".format(len(train), len(val), len(val_test) - len(val)))
    for i in list_all_txt:
        name = total_txt[i][:-4]

        srcImage = os.path.join(image_dir, name + '.jpg')
        srcLabel = os.path.join(txt_dir, name + '.txt')

        if i in train:
            dst_train_Image = os.path.join(img_train_path, name + '.jpg')
            dst_train_Label = os.path.join(label_train_path, name + '.txt')
            shutil.copyfile(srcImage, dst_train_Image)
            shutil.copyfile(srcLabel, dst_train_Label)
        elif i in val:
            dst_val_Image = os.path.join(img_val_path, name + '.jpg')
            dst_val_Label = os.path.join(label_val_path, name + '.txt')
            shutil.copyfile(srcImage, dst_val_Image)
            shutil.copyfile(srcLabel, dst_val_Label)
        else:
            dst_test_Image = os.path.join(img_test_path, name + '.jpg')
            dst_test_Label = os.path.join(label_test_path, name + '.txt')
            shutil.copyfile(srcImage, dst_test_Image)
            shutil.copyfile(srcLabel, dst_test_Label)


if __name__ == '__main__':
    """
    python split_datasets.py --image-dir my_datasets/color_rings/imgs --txt-dir my_datasets/color_rings/txts --save-dir my_datasets/color_rings/train_data
    """
    parser = argparse.ArgumentParser(description='split datasets to train,val,test params')
    parser.add_argument('--image-dir', type=str,default='F:/DL/Pytorch/yolov8/ultralytics-seg/data/skinning/images', help='image path dir')
    parser.add_argument('--txt-dir', type=str,default='F:/DL/Pytorch/yolov8/ultralytics-seg/data/skinning/txt' , help='txt path dir')
    parser.add_argument('--save-dir', default='F:/DL/Pytorch/yolov8/ultralytics-seg/data/skinning/split', type=str, help='save dir')
    args = parser.parse_args()
    image_dir = args.image_dir
    txt_dir = args.txt_dir
    save_dir = args.save_dir

    main(image_dir, txt_dir, save_dir)
3.如何训练yolov8-seg
3.1 skinning.yaml配置
# Train/val/test sets as 1) dir: path/to/imgs, 2) file: path/to/imgs.txt, or 3) list: [path/to/imgs1, path/to/imgs2, ..]
path: F:/DL/Pytorch/yolov8/ultralytics-seg/data/skinning/split  # dataset root dir
train: F:/DL/Pytorch/yolov8/ultralytics-seg/data/skinning/split/images/train  # train images (relative to 'path') 4 images
val: F:/DL/Pytorch/yolov8/ultralytics-seg/data/skinning/split/images/val  # val images (relative to 'path') 4 images
test:  # test images (optional)


nc: 1


# Classes
names:
  0: skinning
3.2 如何训练
from ultralytics.cfg import entrypoint
arg="yolo segment train model=yolov8-seg0.yaml data=ultralytics/cfg/datasets/skinning.yaml"

entrypoint(arg)
3.3 yolov8-seg.yaml
# Ultralytics YOLO 🚀, AGPL-3.0 license
# YOLOv8-seg instance segmentation model. For Usage examples see https://docs.ultralytics.com/tasks/segment

# Parameters
nc: 1  # number of classes
scales: # model compound scaling constants, i.e. 'model=yolov8n-seg.yaml' will call yolov8-seg.yaml with scale 'n'
  # [depth, width, max_channels]
  n: [0.33, 0.25, 1024]
  s: [0.33, 0.50, 1024]
  m: [0.67, 0.75, 768]
  l: [1.00, 1.00, 512]
  x: [1.00, 1.25, 512]

# YOLOv8.0n backbone
backbone:
  # [from, repeats, module, args]
  - [-1, 1, Conv, [64, 3, 2]]  # 0-P1/2
  - [-1, 1, Conv, [128, 3, 2]]  # 1-P2/4
  - [-1, 3, C2f, [128, True]]
  - [-1, 1, Conv, [256, 3, 2]]  # 3-P3/8
  - [-1, 6, C2f, [256, True]]
  - [-1, 1, Conv, [512, 3, 2]]  # 5-P4/16
  - [-1, 6, C2f, [512, True]]
  - [-1, 1, Conv, [1024, 3, 2]]  # 7-P5/32
  - [-1, 3, C2f, [1024, True]]
  - [-1, 1, SPPF, [1024, 5]]  # 9

# YOLOv8.0n head
head:
  - [-1, 1, nn.Upsample, [None, 2, 'nearest']]
  - [[-1, 6], 1, Concat, [1]]  # cat backbone P4
  - [-1, 3, C2f, [512]]  # 12

  - [-1, 1, nn.Upsample, [None, 2, 'nearest']]
  - [[-1, 4], 1, Concat, [1]]  # cat backbone P3
  - [-1, 3, C2f, [256]]  # 15 (P3/8-small)

  - [-1, 1, Conv, [256, 3, 2]]
  - [[-1, 12], 1, Concat, [1]]  # cat head P4
  - [-1, 3, C2f, [512]]  # 18 (P4/16-medium)

  - [-1, 1, Conv, [512, 3, 2]]
  - [[-1, 9], 1, Concat, [1]]  # cat head P5
  - [-1, 3, C2f, [1024]]  # 21 (P5/32-large)

  - [[15, 18, 21], 1, Segment, [nc, 32, 256]]  # Segment(P3, P4, P5)
4.训练结果可视化
Mask map0.5 原始为0.625
MaskF1_curve

MaskP_curve

MaskPR_curve

MaskR_curve
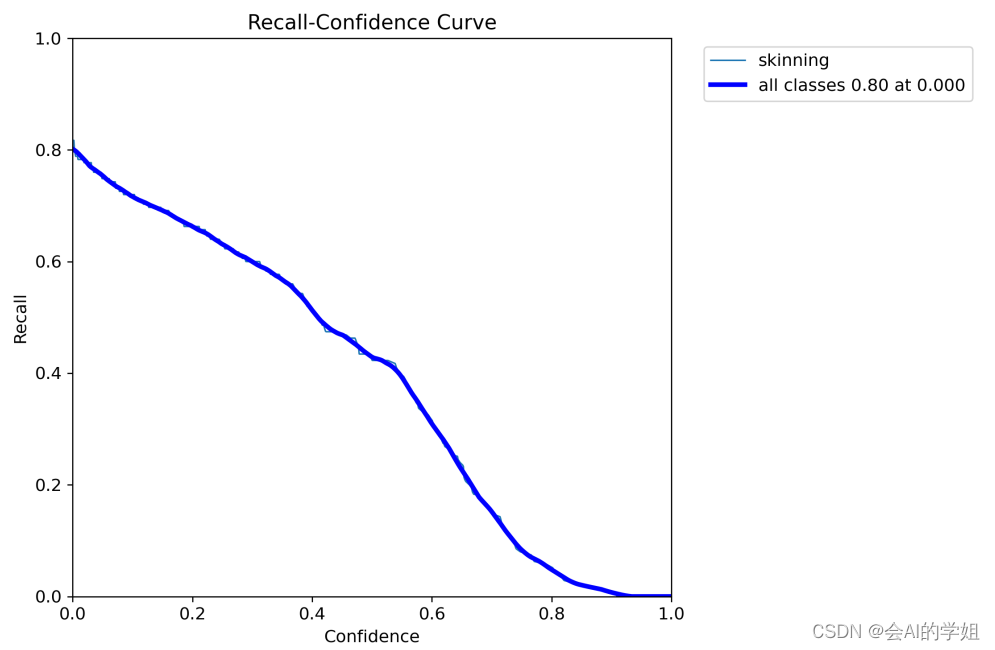
预测结果: