提示:免费获取本文涉及的完整代码与数据集,请联系助理老师 peaeci122
使用最新“KerasCV YOLOv8”模型进行红绿灯检测的综合指南
YOLO目标检测模型已经进入了无数的应用领域,从监控系统到自动驾驶汽车。那么,如果在KerasCV框架下配对YOLOv8的这种功能时会发生什么呢?
最近,KerasCV将著名的YOLOv8检测模型集成到其库中,我们来探讨一下“如何使用自定义数据集对YOLOv8进行微调”,会涉及到以下几点:
· 在红绿灯检测数据集上微调YOLOv8
· 在验证图像上运行推理
· 分析结果
 YOLOv8 输出
" />
YOLOv8 输出
" />
目录
1、红绿灯检测数据集
2、使用 KerasCV YOLOv8 进行物体检测
3、验证图像的推理
4、使用经过训练的 KerasCV YOLOv8 模型进行视频推理
5、总结与结论
交通灯检测数据集
使用红绿灯检测数据集训练 KerasCV YOLOv8 模型,小型红绿灯数据集(S2TLD)由Thinklab提供,在笔记本的下载链接中提供了图像和注释的集合。数据集包含4564 个图像,注释以 XML 格式呈现,以下图片清晰地描绘了收集图片的不同场景。
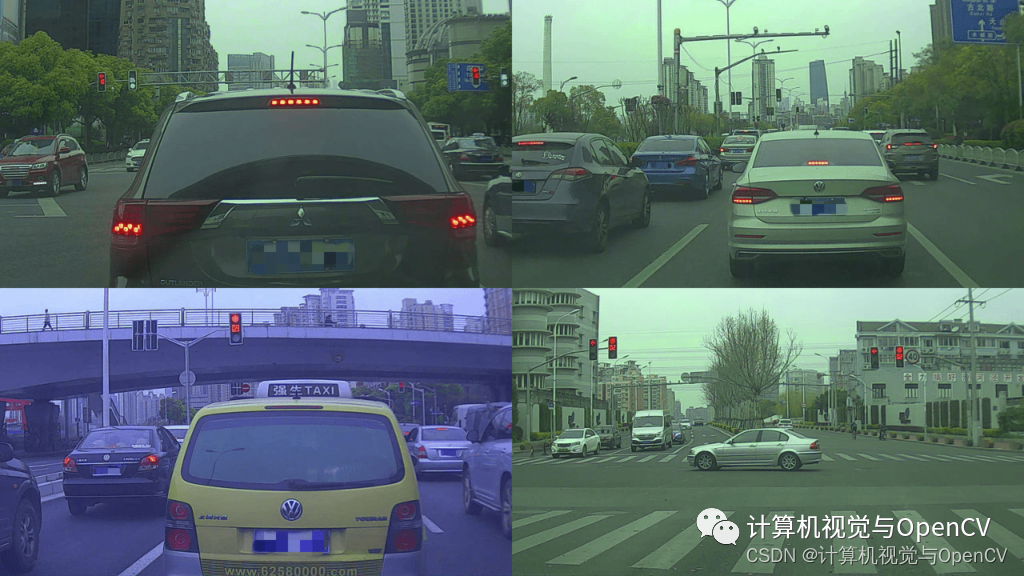 图 2. S2TLD 数据集中的图像样本
将要使用的数据集版本包含四个类别
red
yellow
green
off
使用 KerasCV YOLOv8 进行物体检测,从设置必要的库开始:
!pip install keras-cv==0.5.1
!pip install keras-core
初始步骤中,设置环境以利用“KerasCV YOLOv8”的功能进行对象检测。安装 keras-cv 和 keras-core 可确保开始对象检测时,所需的所有模块的可用性,维护正确的版本防止兼容性问题非常重要。本教程,我们使用 keras-cv 0.5.1 版本,以获得YOLOv8的最佳效果。
软件包和库导入
导入所需的软件包和库
import os
import xml.etree.ElementTree as ET
import tensorflow as tf
import keras_cv
import requests
import zipfile

from tqdm.auto import tqdm
from tensorflow import keras
from keras_cv import bounding_box
from keras_cv import visualization
在深入研究“KerasCV YOLOv8”用于目标检测的核心功能之前,让我们通过导入必要的库和模块来奠定基础:
os:帮助与 Python 运行的底层操作系统进行交互,用于目录操作;
xml.etree .ElementTree (ET):协助解析 XML 文件,常用于标注对象位置的数据集;
tensorflow & keras:KerasCV YOLOv8 "是实现深度学习功能的基础;
keras_cv:一个重要的资料库,为我们的项目提供了利用 YOLOv8 模型的工具;
requests:允许发送HTTP请求,这对于获取在线数据集或模型权重是必不可少的;
zipfile:方便提取压缩文件,在处理压缩数据集或模型文件时可能有用
tqdm:通过进度条改进代码,使冗长的程序变得简单易用
来自keras_cv的bounding_box和visualization:在使用KerasCV YOLOv8检测对象后,这些对于处理边界框操作和可视化结果至关重要。
确保导入这些模块后,我们就可以高效地进行剩余的对象检测流程了。
下载数据集
首先,从直接来源下载红绿灯检测数据集
# Download dataset.
def download_file(url, save_name):
    if not os.path.exists(save_name):
        print(f"Downloading file")
        file = requests.get(url, stream=True)
        total_size = int(file.headers.get('content-length', 0))
        block_size = 1024
        progress_bar = tqdm(
            total=total_size,
            unit='iB',
            unit_scale=True
        )
        with open(os.path.join(save_name), 'wb') as f:
            for data in file.iter_content(block_size):
                progress_bar.update(len(data))
                f.write(data)
        progress_bar.close()
    else:
        print('File already present')

download_file(
    'https://www.dropbox.com/scl/fi/suext2oyjxa0v4p78bj3o/S2TLD_720x1280.zip?rlkey=iequuynn54uib0uhsc7eqfci4&dl=1',
    'S2TLD_720x1280.zip'
)
获取数据集请联系peaeci122
解压数据集
# Unzip the data file
def unzip(zip_file=None):
    try:
        with zipfile.ZipFile(zip_file) as z:
            z.extractall("./")
            print("Extracted all")
    except:
        print("Invalid file")

unzip('S2TLD_720x1280.zip')
数据集将提取到 S2TLD_720x1280 目录中。
数据集和训练参数
需要定义适当的数据集和训练参数,其中包括用于训练和验证的数据集拆分、批次大小、学习率以及 KerasCV YOLOv8 模型需要训练的epoch数。
SPLIT_RATIO = 0.2
BATCH_SIZE = 8
LEARNING_RATE = 0.001
EPOCH = 75
GLOBAL_CLIPNORM = 10.0
其中 20% 的数据用于验证,其余数据用于训练。考虑到用于训练的模型和图像大小,批量大小为 8,学习率设为 0.001,模型将训练 75 个 epochs。
数据集准备
这是训练深度学习模型最重要的一个方面,我们首先要定义类名,并访问所有图像和注释文件。
class_ids = [
    "red",
    "yellow",
    "green",
    "off",
]
class_mapping = dict(zip(range(len(class_ids)), class_ids))

# Path to images and annotations
path_images = "S2TLD_720x1280/images/"
path_annot = "S2TLD_720x1280/annotations/"

# Get all XML file paths in path_annot and sort them
xml_files = sorted(
    [
        os.path.join(path_annot, file_name)
        for file_name in os.listdir(path_annot)
        if file_name.endswith(".xml")
    ]
)

# Get all JPEG image file paths in path_images and sort them
jpg_files = sorted(
    [
        os.path.join(path_images, file_name)
        for file_name in os.listdir(path_images)
        if file_name.endswith(".jpg")
    ]
)
class_mapping 字典提供了从数字 ID 到相应类名的简便查询,所有图像和注释文件路径分别存储在 xml_files 和 jpg_files 中。
接下来是解析 XML 注释文件,以存储训练所需的标签和边界框注释。
def parse_annotation(xml_file):
    tree = ET.parse(xml_file)
    root = tree.getroot()

    image_name = root.find("filename").text
    image_path = os.path.join(path_images, image_name)

    boxes = []
    classes = []
    for obj in root.iter("object"):
        cls = obj.find("name").text
        classes.append(cls)

        bbox = obj.find("bndbox")
        xmin = float(bbox.find("xmin").text)
        ymin = float(bbox.find("ymin").text)
        xmax = float(bbox.find("xmax").text)
        ymax = float(bbox.find("ymax").text)
        boxes.append([xmin, ymin, xmax, ymax])

    class_ids = [
        list(class_mapping.keys())[list(class_mapping.values()).index(cls)]
        for cls in classes
    ]
    return image_path, boxes, class_ids


image_paths = []
bbox = []
classes = []
for xml_file in tqdm(xml_files):
    image_path, boxes, class_ids = parse_annotation(xml_file)
    image_paths.append(image_path)
    bbox.append(boxes)
    classes.append(class_ids)
parse_annotation(xml_file) 函数会深入研究每个 XML 文件,提取文件名、对象类别及其各自的边界框坐标。在 class_mapping 的帮助下,它会将类名转换为类 ID,以便于使用。
解析完所有XML文件后,我们在单独的列表中收集所有图像路径、边界框和类id,然后使用 tf.data.Dataset.from_tensor_slices 将它们组合成 TensorFlow数据集。
bbox = tf.ragged.constant(bbox)
classes = tf.ragged.constant(classes)
image_paths = tf.ragged.constant(image_paths)

data = tf.data.Dataset.from_tensor_slices((image_paths, classes, bbox))
所有数据并不存储在单个tf.data.Dataset对象中,需要使用 SPLIT_RATIO 将其分为训练集和验证集。
# Determine the number of validation samples
num_val = int(len(xml_files) * SPLIT_RATIO)

# Split the dataset into train and validation sets
val_data = data.take(num_val)
train_data = data.skip(num_val)
加载图像和注释,并应用所需的预处理。
def load_image(image_path):
    image = tf.io.read_file(image_path)
    image = tf.image.decode_jpeg(image, channels=3)
    return image

def load_dataset(image_path, classes, bbox):
    # Read Image
    image = load_image(image_path)
    bounding_boxes = {
        "classes": tf.cast(classes, dtype=tf.float32),
        "boxes": bbox,
    }
    return {"images": tf.cast(image, tf.float32), "bounding_boxes": bounding_boxes}

augmenter = keras.Sequential(
    layers=[
        keras_cv.layers.RandomFlip(mode="horizontal", bounding_box_format="xyxy"),
        keras_cv.layers.JitteredResize(
            target_size=(640, 640),
            scale_factor=(1.0, 1.0),
            bounding_box_format="xyxy",
        ),
    ]
)

train_ds = train_data.map(load_dataset, num_parallel_calls=tf.data.AUTOTUNE)
train_ds = train_ds.shuffle(BATCH_SIZE * 4)
train_ds = train_ds.ragged_batch(BATCH_SIZE, drop_remainder=True)
train_ds = train_ds.map(augmenter, num_parallel_calls=tf.data.AUTOTUNE)
对于训练集,将图像调整为 640×640 分辨率,并应用随机水平翻转增强,增强将确保模型不会过早地过拟合。
至于验证集,则不需要任何增强,只需调整图像大小就足够了。
resizing = keras_cv.layers.JitteredResize(
    target_size=(640, 640),
    scale_factor=(1.0, 1.0),
    bounding_box_format="xyxy",
)

val_ds = val_data.map(load_dataset, num_parallel_calls=tf.data.AUTOTUNE)
val_ds = val_ds.shuffle(BATCH_SIZE * 4)
val_ds = val_ds.ragged_batch(BATCH_SIZE, drop_remainder=True)
val_ds = val_ds.map(resizing, num_parallel_calls=tf.data.AUTOTUNE)
进入下一阶段之前,使用上面创建的训练和验证数据集可视化一些样本。
def visualize_dataset(inputs, value_range, rows, cols, bounding_box_format):
    inputs = next(iter(inputs.take(1)))
    images, bounding_boxes = inputs["images"], inputs["bounding_boxes"]
    visualization.plot_bounding_box_gallery(
        images,
        value_range=value_range,
        rows=rows,
        cols=cols,
        y_true=bounding_boxes,
        scale=5,
        font_scale=0.7,
        bounding_box_format=bounding_box_format,
        class_mapping=class_mapping,
    )


visualize_dataset(
    train_ds, bounding_box_format="xyxy", value_range=(0, 255), rows=2, cols=2
)

visualize_dataset(
    val_ds, bounding_box_format="xyxy", value_range=(0, 255), rows=2, cols=2
)
以下是上述可视化功能的一些输出结果
 图 3.由 KerasCV 可视化模块注释的交通灯图像
最后,创建最终的数据集格式
def dict_to_tuple(inputs):
    return inputs["images"], inputs["bounding_boxes"]


train_ds = train_ds.map(dict_to_tuple, num_parallel_calls=tf.data.AUTOTUNE)
train_ds = train_ds.prefetch(tf.data.AUTOTUNE)

val_ds = val_ds.map(dict_to_tuple, num_parallel_calls=tf.data.AUTOTUNE)
val_ds = val_ds.prefetch(tf.data.AUTOTUNE)
为方便模型训练,使用 dict_too_tuple 函数对数据集进行转换,并通过预取功能对数据集进行优化,以获得更好的性能。