'''
    根据txt标签文件内的信息,制作真实的标记框,并进行一定的数据增强,最终输出一个7*7*30的张量
'''

import torch
import cv2
import os
import os.path
import random
import numpy as np
from torch.utils.data import DataLoader, Dataset
from torchvision.transforms import ToTensor
from PIL import Image

# 类别个数,该数据集有20类
CLASS_NUM = 20

class yoloDataset(Dataset):
    '''
        继承Dataset类,必须要实现 __getitem__和 __len__
    '''
    image_size = 448 # 正好是7个倍数,方便分成7x7块

    # 把txt文件中目标检测框信息存放到:boxes,labels
    def __init__(self,img_root,list_file,train,transform): # list_file为txt文件,
        self.root = img_root #img_root为图片路径
        self.train = train
        self.transform = transform

        self.fnames = []
        self.boxes = []
        self.labels = []

        self.S = 7 # 表示分成的网格数量,此时表示将图像划分为7x7个网格
        self.B = 2 # 表示每个网格要预测的边界框的数量,每个cell预测两个2个边界框
        self.C = CLASS_NUM # 表示类别总数
        self.mean = (123,117,104) # 定义RGB图像的均值。 yolov1中会对输入图像进行预处理,减去均值进行归一化。

        file_txt = open(list_file)
        lines = file_txt.readlines() # 读取txt文件的每一行
        for line in lines:
            splited = line.strip().split()  # 移除首位的换行符号再生成一张列表
            self.fnames.append(splited[0])  # 存储图片的名字
            num_boxes = (len(splited) - 1) // 5  # 每一幅图片里面有多少个bbox
            box = []
            label = []
            for i in range(num_boxes):  # bbox四个角的坐标
                x = float(splited[1 + 5 * i])
                y = float(splited[2 + 5 * i])
                x2 = float(splited[3 + 5 * i])
                y2 = float(splited[4 + 5 * i])
                c = splited[5 + 5 * i]  # 行中第5个位置是物体的类别,值域 0-19
                box.append([x, y, x2, y2])
                label.append(int(c))
            self.boxes.append(torch.Tensor(box))
            self.labels.append(torch.LongTensor(label))
        self.num_samples = len(self.boxes)

    def __getitem__(self, idx):
        '''
        传入id后
        1.数据增强:自己实现的 随机翻转,随机放缩,randomBlur,RandomBrightness,randomShift
        2.对标注的框的坐标进行/ (w,h)进行归一化
        3.pytorch预训练使用RGB,图片默认时BGR,所以将BGR2RGB
        4.将图片减去均值进行归一化
        5.将图片resize乘指定大小,此时时448
        6.将图片标签编码到7x7*30的向量
        :param idx:
        :return:
        '''
        fname = self.fnames[idx]
        img = cv2.imread(os.path.join(self.root + fname))
        boxes = self.boxes[idx].clone() # 此时必须用.clone(),如果不用clone,赋值操作只是加了一个索引,修改boxes时会修改原boxes[idx]
        labels = self.labels[idx].clone()

        if self.train:  # 数据增强里面的各种变换用torch自带的transform是做不到的,因为对图片进行旋转、随即裁剪等会造成bbox的坐标也会发生变化,所以需要自己来定义数据增强
            img, boxes = self.random_flip(img, boxes)
            img, boxes = self.randomScale(img, boxes)
            img = self.randomBlur(img)
            img = self.RandomBrightness(img)
            # img = self.RandomHue(img)
            # img = self.RandomSaturation(img)
            img, boxes, labels = self.randomShift(img, boxes, labels)
            # img, boxes, labels = self.randomCrop(img, boxes, labels)
        h, w, _ = img.shape
        # 对边界框进行了归一化
        boxes /= torch.Tensor([w, h, w, h]).expand_as(boxes)  # 坐标归一化处理,为了方便训练
        img = self.BGR2RGB(img)  # because pytorch pretrained model use RGB
        img = self.subMean(img, self.mean)  # 减去均值
        img = cv2.resize(img, (self.image_size, self.image_size))  # 将所有图片都resize到指定大小
        # 将图片标签编码到7x7*30的向量
        target = self.encoder(boxes, labels)

        for t in self.transform:
            img = t(img)

        return img, target

    def __len__(self):
        return self.num_samples

    def encoder(self,boxes,labels):
        '''
        输入:
        输出: 返回target, target是 (网格x,网格y,第一个框x1,y1,w1,h1,第二个框的x2,y2,w2,h2)  ,目标框都是归一化后的。
        :param boxes: 归一化后的边界框 宽和高应该是 1,1
        :param labels: ground truth (7x7)
        :return:
        '''
        grid_num =7
        target = torch.zeros((grid_num,grid_num,int(CLASS_NUM + 2 * 5)))
        cell_size = 1. /grid_num
        # [(x2,y2) - (x1,y1)] = w,h,归一化后的坐标相减 应该得到的w,h为1,1
        wh = boxes[:,2:] - boxes[:,:2]
        print(f'wh={wh}')

        # 得到所有锚框的中心: [(x2,y2) + (x1,y1)] / 2
        cxcy = (boxes[:,2:] + boxes[:,:2]) / 2

        # 获取锚框的行数,遍历所有锚框
        for i in range(cxcy.size()[0]):
            # 取出一个中心坐标
            cxcy_sample = cxcy[i]
            for i in range(cxcy.size()[0]):
                cxcy_sample = cxcy[i]  # 中心坐标  1*1
                ij = (cxcy_sample / cell_size).ceil() - 1  # 左上角坐标 (7*7)为整数
                # 第一个框的置信度
                target[int(ij[1]), int(ij[0]), 4] = 1
                # 第二个框的置信度
                target[int(ij[1]), int(ij[0]), 9] = 1

                target[int(ij[1]), int(ij[0]), int(labels[i]) + 10] = 1  # 20个类别对应处的概率设置为1

                xy = ij * cell_size  # 归一化左上坐标  (1*1)

                delta_xy = (cxcy_sample - xy) / cell_size  # 中心与左上坐标差值  (7*7)

                # 坐标w,h代表了预测的bounding box的width、height相对于整幅图像width,height的比例
                target[int(ij[1]), int(ij[0]), 2:4] = wh[i]  # w1,h1
                target[int(ij[1]), int(ij[0]), :2] = delta_xy  # x1,y1

                # 每一个网格有两个边框
                target[int(ij[1]), int(ij[0]), 7:9] = wh[i]  # w2,h2
                # 由此可得其实返回的中心坐标其实是相对左上角顶点的偏移,因此在进行预测的时候还需要进行解码
                target[int(ij[1]), int(ij[0]), 5:7] = delta_xy  # [5,7) 表示x2,y2
            return target  # (网格x,网格y,第一个框x1,y1,w1,h1,第二个框的x2,y2,w2,h2)  ,目标框都是归一化后的。

    # 以下方法都是数据增强操作
    def BGR2RGB(self, img):
        return cv2.cvtColor(img, cv2.COLOR_BGR2RGB)

    def BGR2HSV(self, img):
        return cv2.cvtColor(img, cv2.COLOR_BGR2HSV)

    def HSV2BGR(self, img):
        return cv2.cvtColor(img, cv2.COLOR_HSV2BGR)

    def RandomBrightness(self, bgr):
        if random.random() < 0.5:
            hsv = self.BGR2HSV(bgr)
            h, s, v = cv2.split(hsv)
            adjust = random.choice([0.5, 1.5])
            v = v * adjust
            v = np.clip(v, 0, 255).astype(hsv.dtype)
            hsv = cv2.merge((h, s, v))
            bgr = self.HSV2BGR(hsv)
        return bgr

    def RandomSaturation(self, bgr):
        if random.random() < 0.5:
            hsv = self.BGR2HSV(bgr)
            h, s, v = cv2.split(hsv)
            adjust = random.choice([0.5, 1.5])
            s = s * adjust
            s = np.clip(s, 0, 255).astype(hsv.dtype)
            hsv = cv2.merge((h, s, v))
            bgr = self.HSV2BGR(hsv)
        return bgr

    def RandomHue(self, bgr):
        if random.random() < 0.5:
            hsv = self.BGR2HSV(bgr)
            h, s, v = cv2.split(hsv)
            adjust = random.choice([0.5, 1.5])
            h = h * adjust
            h = np.clip(h, 0, 255).astype(hsv.dtype)
            hsv = cv2.merge((h, s, v))
            bgr = self.HSV2BGR(hsv)
        return bgr

    def randomBlur(self, bgr):
        if random.random() < 0.5:
            bgr = cv2.blur(bgr, (5, 5))
        return bgr

    def randomShift(self, bgr, boxes, labels):
        # 平移变换
        center = (boxes[:, 2:] + boxes[:, :2]) / 2
        if random.random() < 0.5:
            height, width, c = bgr.shape
            after_shfit_image = np.zeros((height, width, c), dtype=bgr.dtype)
            after_shfit_image[:, :, :] = (104, 117, 123)  # bgr
            shift_x = random.uniform(-width * 0.2, width * 0.2)
            shift_y = random.uniform(-height * 0.2, height * 0.2)
            # print(bgr.shape,shift_x,shift_y)
            # 原图像的平移
            if shift_x >= 0 and shift_y >= 0:
                after_shfit_image[int(shift_y):,int(shift_x):,:] = bgr[:height - int(shift_y),:width - int(shift_x),:]
            elif shift_x >= 0 and shift_y < 0:
                after_shfit_image[:height + int(shift_y),
                int(shift_x):,
                :] = bgr[-int(shift_y):,
                     :width - int(shift_x),
                     :]
            elif shift_x < 0 and shift_y >= 0:
                after_shfit_image[int(shift_y):, :width +
                                                  int(shift_x), :] = bgr[:height -
                                                                          int(shift_y), -
                                                                                        int(shift_x):, :]
            elif shift_x < 0 and shift_y < 0:
                after_shfit_image[:height + int(shift_y), :width + int(
                    shift_x), :] = bgr[-int(shift_y):, -int(shift_x):, :]

            shift_xy = torch.FloatTensor(
                [[int(shift_x), int(shift_y)]]).expand_as(center)
            center = center + shift_xy
            mask1 = (center[:, 0] > 0) & (center[:, 0] < width)
            mask2 = (center[:, 1] > 0) & (center[:, 1] < height)
            mask = (mask1 & mask2).view(-1, 1)
            boxes_in = boxes[mask.expand_as(boxes)].view(-1, 4)
            if len(boxes_in) == 0:
                return bgr, boxes, labels
            box_shift = torch.FloatTensor(
                [[int(shift_x), int(shift_y), int(shift_x), int(shift_y)]]).expand_as(boxes_in)
            boxes_in = boxes_in + box_shift
            labels_in = labels[mask.view(-1)]
            return after_shfit_image, boxes_in, labels_in
        return bgr, boxes, labels

    def randomScale(self, bgr, boxes):
        # 固定住高度,以0.8-1.2伸缩宽度,做图像形变
        if random.random() < 0.5:
            scale = random.uniform(0.8, 1.2)
            height, width, c = bgr.shape
            bgr = cv2.resize(bgr, (int(width * scale), height))
            scale_tensor = torch.FloatTensor(
                [[scale, 1, scale, 1]]).expand_as(boxes)
            boxes = boxes * scale_tensor
            return bgr, boxes
        return bgr, boxes

    def randomCrop(self, bgr, boxes, labels):
        if random.random() < 0.5:
            center = (boxes[:, 2:] + boxes[:, :2]) / 2
            height, width, c = bgr.shape
            h = random.uniform(0.6 * height, height)
            w = random.uniform(0.6 * width, width)
            x = random.uniform(0, width - w)
            y = random.uniform(0, height - h)
            x, y, h, w = int(x), int(y), int(h), int(w)

            center = center - torch.FloatTensor([[x, y]]).expand_as(center)
            mask1 = (center[:, 0] > 0) & (center[:, 0] < w)
            mask2 = (center[:, 1] > 0) & (center[:, 1] < h)
            mask = (mask1 & mask2).view(-1, 1)

            boxes_in = boxes[mask.expand_as(boxes)].view(-1, 4)
            if (len(boxes_in) == 0):
                return bgr, boxes, labels
            box_shift = torch.FloatTensor([[x, y, x, y]]).expand_as(boxes_in)

            boxes_in = boxes_in - box_shift
            boxes_in[:, 0] = boxes_in[:, 0].clamp_(min=0, max=w)
            boxes_in[:, 2] = boxes_in[:, 2].clamp_(min=0, max=w)
            boxes_in[:, 1] = boxes_in[:, 1].clamp_(min=0, max=h)
            boxes_in[:, 3] = boxes_in[:, 3].clamp_(min=0, max=h)

            labels_in = labels[mask.view(-1)]
            img_croped = bgr[y:y + h, x:x + w, :]
            return img_croped, boxes_in, labels_in
        return bgr, boxes, labels

    def subMean(self, bgr, mean):
        mean = np.array(mean, dtype=np.float32)
        bgr = bgr - mean
        return bgr

    def random_flip(self, im, boxes):
        if random.random() < 0.5:
            im_lr = np.fliplr(im).copy()
            h, w, _ = im.shape
            xmin = w - boxes[:, 2]
            xmax = w - boxes[:, 0]
            boxes[:, 0] = xmin
            boxes[:, 2] = xmax
            return im_lr, boxes
        return im, boxes

    def random_bright(self, im, delta=16):
        alpha = random.random()
        if alpha > 0.3:
            im = im * alpha + random.randrange(-delta, delta)
            im = im.clip(min=0, max=255).astype(np.uint8)
        return im
小程序
Gorm
命令行
decodeByteArray
从网络中获取bitmap
Debezium报错处理系列
DASCTF2022十月挑战赛
图像半自动标注
mysql存储过程
远程工作
端口转发
Smart Tomcat
重构
PCB设计
xargs
个人开发
android教程
LabVIEW开发
SMBIOS
服务容错
【yolov1】yoloData.py
相关文章
qt QMutex 判断对象是否已经锁的状态
在 Qt 中,可以使用 QMutexLocker 类来判断对象是否已经锁定。QMutexLocker 是一个方便的类,它在构造函数中锁定指定的 QMutex 对象,并在析构函数中释放锁。这样,我们可以使用 QMutexLocker 对象的生存周期来判断锁定状态。
下面是…

阿里云通义千问14B模型开源!性能超越Llama2等同等尺寸模型
9月25日,阿里云开源通义千问140亿参数模型Qwen-14B及其对话模型Qwen-14B-Chat,免费可商用。Qwen-14B在多个权威评测中超越同等规模模型,部分指标甚至接近Llama2-70B。阿里云此前开源了70亿参数模型Qwen-7B等,一个多月下载量破100万࿰…
【面试】找到一个数组中超过一半的数——摩尔投票算法
摩尔投票算法
思路
算法首先将数组的第一个元素作为候选众数,并设置初始计数为1。然后,遍历数组中的每个元素,如果当前元素等于候选众数,则增加计数,否则减少计数。当计数降为0时,算法更换候选众数为当前…
Python字典排序Key不同lambda
有这么一个dict类似这样
s {AuthReq: {times: 1, size: 0}, AuthRsp: {times: 1, size: 0}, AccountLoginReq: {times: 1, size: 0}, AccountLoginRsp: {times: 2, size: 55}}嵌套字典且Key均不同,对其进行排序操作
s1 sorted(s.items(), keylambda x: x[1][tim…
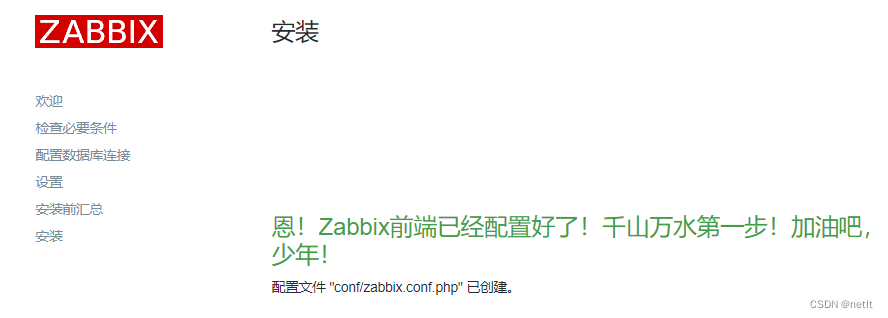
ZABBIX 6.4安装部署
ZABBIX 6.4安装部署
zabbix的主要组成:
1、Zabbix Server6.4:Zabbix 服务端,是 Zabbix 的核心组件。它负责接收监控数据并触发告警,还负责将监控数据持久化到数据库中。
2、Zabbix Agent:Zabbix 客户端,部…
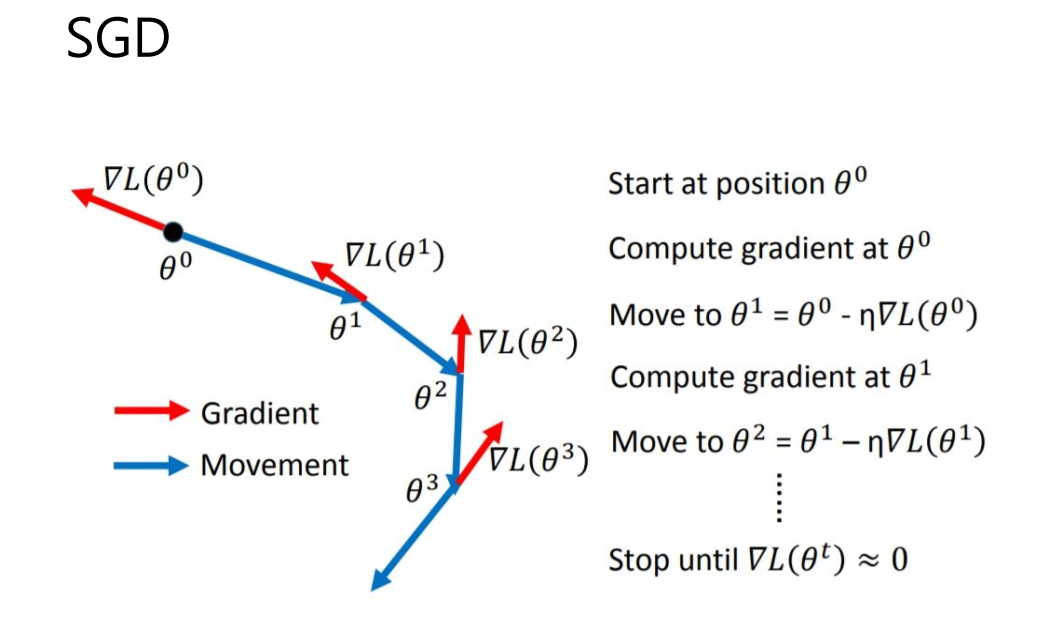
竞赛选题 基于深度学习的植物识别算法 - cnn opencv python
文章目录 0 前言1 课题背景2 具体实现3 数据收集和处理3 MobileNetV2网络4 损失函数softmax 交叉熵4.1 softmax函数4.2 交叉熵损失函数 5 优化器SGD6 最后 0 前言
🔥 优质竞赛项目系列,今天要分享的是
🚩 **基于深度学习的植物识别算法 ** …
wps及word通配匹配与正则匹配之异同
前言
今天在chatgpt上找找有什么比赛可以参加。下面是它给我的部分答案,我想将其制成文档裱起来,并突出比赛名方便日后查找。 这时理所当然地想到了查找替换功能,但是当我启用时却发现正则匹配居然没有了,现在只有通配匹配了。 …
React Router 关键知识点回顾
安装 React Router
npm i react-router
npm i react-router-dom配置路由
使用React Router来定义应用的路由其实比较简单,只需要简单的两个步骤:
在项目根目录下的index.tsx文件中声明堆栈路由。
<BrowserRouter><App />
</BrowserRo…
最新文章
- 客户青海地区图像识别,云拍产品实施安装#数采物联
- Internet Download Manager6.42最新下载器互联网冲浪小能手们!
- 构建与操作共享栈
- C++:缺省参数|函数重载|引用|const引用
- 《数据结构-用C语言描述第三版》课后答案 第一章
- 【HarmonyOS】关于官方推荐的组件级路由Navigation的心得体会
- clojure 中文标识符
- ES6中用变量名或者表达式作为对象属性名
- Windows操作系统堆和栈的区别
- 人员选择树,搜索自动筛选功能 (vue+chosen+zTree)
- (五)Java游戏部署在Windows Mobile平台仿真器(Microsoft)
- .NET Framework 3.0 版本命名與部署 QA