📢前言:本篇是关于如何使用YoloV5+Deepsort训练自己的数据集,从而实现目标检测与目标追踪,并绘制出物体的运动轨迹。本章讲解的为第三部分内容:数据集的制作、Deepsort模型的训练以及动物运动轨迹的绘制。本文中用到的数据集均为自采,实验动物为斑马鱼。
💻环境&配置:RTX 3060、CUDA Version: 11.1、torch_version:1.9.1+cu111、python:3.8
💬源码如下:
GitHub - mikel-brostrom/yolo_tracking: A collection of SOTA real-time, multi-object tracking algorithms for object detectors
GitHub - Sharpiless/Yolov5-Deepsort: 最新版本yolov5+deepsort目标检测和追踪,能够显示目标类别,支持5.0版本可训练自己数据集
如果想进一步了解Yolov5+Deepsort中的算法,猛戳这里:
【Yolov5+Deepsort】训练自己的数据集(1)| 目标检测&追踪 | 轨迹绘制
如果想要实现训练集的采集与划分,Yolov5模型的训练,猛戳这里:
Ⅰ Deepsort模型训练
0x00 数据集准备
Deepsort所需要的的数据集与前面Yolov5目标检测的有所不同。
这里需要借助labelimg工具手动做出标定生成xml文件,再撰写脚本把图像中的检测目标扣出来,作为我们的数据集。
import cv2
import xml.etree.ElementTree as ET
import numpy as np

import xml.dom.minidom
import os
import argparse


def main():
    # JPG文件的地址
    img_path = 'path'
    # XML文件的地址
    anno_path = 'path'
    # 存结果的文件夹

    cut_path = '/home/zqy/Desktop/yolov5-master/nxm_data/crops/'
    if not os.path.exists(cut_path):
        os.makedirs(cut_path)
    # 获取文件夹中的文件
    imagelist = os.listdir(img_path)
    # print(imagelist
    for image in imagelist:
        image_pre, ext = os.path.splitext(image)
        img_file = img_path + image
        img = cv2.imread(img_file)
        xml_file = anno_path + image_pre + '.xml'
        # DOMTree = xml.dom.minidom.parse(xml_file)
        # collection = DOMTree.documentElement
        # objects = collection.getElementsByTagName("object")

        tree = ET.parse(xml_file)
        root = tree.getroot()
        # if root.find('object') == None:
        #     return
        obj_i = 0
        for obj in root.iter('object'):
            obj_i += 1
            print(obj_i)
            cls = obj.find('name').text
            xmlbox = obj.find('bndbox')
            b = [int(float(xmlbox.find('xmin').text)), int(float(xmlbox.find('ymin').text)),
                 int(float(xmlbox.find('xmax').text)),
                 int(float(xmlbox.find('ymax').text))]
            img_cut = img[b[1]:b[3], b[0]:b[2], :]
            path = os.path.join(cut_path, cls)
            # 目录是否存在,不存在则创建
            mkdirlambda = lambda x: os.makedirs(x) if not os.path.exists(x) else True
            mkdirlambda(path)
            try:
                cv2.imwrite(os.path.join(cut_path, cls, '{}_{:0>2d}.jpg'.format(image_pre, obj_i)), img_cut)
            except:
                continue

            print("&&&&")


if __name__ == '__main__':
    main()
得到完整的数据集后,我们对数据集进行划分 :
import os
from PIL import Image
from shutil import copyfile, copytree, rmtree, move

PATH_DATASET = 'path'  # 需要处理的文件夹
PATH_NEW_DATASET = 'path'  # 处理后的文件夹
PATH_ALL_IMAGES = PATH_NEW_DATASET + '/all_images'
PATH_TRAIN = PATH_NEW_DATASET + '/train'
PATH_TEST = PATH_NEW_DATASET + '/test'


# 定义创建目录函数
def mymkdir(path):
    path = path.strip()  # 去除首位空格
    path = path.rstrip("\\")  # 去除尾部 \ 符号
    isExists = os.path.exists(path)  # 判断路径是否存在
    if not isExists:
        os.makedirs(path)  # 如果不存在则创建目录
        print(path + ' 创建成功')
        return True
    else:
        # 如果目录存在则不创建,并提示目录已存在
        print(path + ' 目录已存在')
        return False


class BatchRename():
    '''
    批量重命名文件夹中的图片文件
    '''

    def __init__(self):
        self.path = PATH_DATASET  # 表示需要命名处理的文件夹

    # 修改图像尺寸
    def resize(self):
        for aroot, dirs, files in os.walk(self.path):
            # aroot是self.path目录下的所有子目录(含self.path),dir是self.path下所有的文件夹的列表.
            filelist = files  # 注意此处仅是该路径下的其中一个列表
            # print('list', list)

            # filelist = os.listdir(self.path) #获取文件路径
            total_num = len(filelist)  # 获取文件长度(个数)

            for item in filelist:
                if item.endswith('.jpg'):  # 初始的图片的格式为jpg格式的(或者源文件是png格式及其他格式,后面的转换格式就可以调整为自己需要的格式即可)
                    src = os.path.join(os.path.abspath(aroot), item)

                    # 修改图片尺寸到128宽*256高
                    im = Image.open(src)
                    out = im.resize((128, 256), Image.ANTIALIAS)  # resize image with high-quality
                    out.save(src)  # 原路径保存

    def rename(self):

        for aroot, dirs, files in os.walk(self.path):
            # aroot是self.path目录下的所有子目录(含self.path),dir是self.path下所有的文件夹的列表.
            filelist = files  # 注意此处仅是该路径下的其中一个列表
            # print('list', list)

            # filelist = os.listdir(self.path) #获取文件路径
            total_num = len(filelist)  # 获取文件长度(个数)

            i = 1  # 表示文件的命名是从1开始的
            for item in filelist:
                if item.endswith('.jpg'):  # 初始的图片的格式为jpg格式的(或者源文件是png格式及其他格式,后面的转换格式就可以调整为自己需要的格式即可)
                    src = os.path.join(os.path.abspath(aroot), item)

                    # 根据图片名创建图片目录
                    dirname = str(item.split('_')[0])
                    # 为相同车辆创建目录
                    # new_dir = os.path.join(self.path, '..', 'bbox_all', dirname)
                    new_dir = os.path.join(PATH_ALL_IMAGES, dirname)
                    if not os.path.isdir(new_dir):
                        mymkdir(new_dir)

                    # 获得new_dir中的图片数
                    num_pic = len(os.listdir(new_dir))

                    dst = os.path.join(os.path.abspath(new_dir),
                                       dirname + 'C1T0001F' + str(num_pic + 1) + '.jpg')
                    # 处理后的格式也为jpg格式的,当然这里可以改成png格式    C1T0001F见mars.py filenames 相机ID,跟踪指数
                    # dst = os.path.join(os.path.abspath(self.path), '0000' + format(str(i), '0>3s') + '.jpg')    这种情况下的命名格式为0000000.jpg形式,可以自主定义想要的格式
                    try:
                        copyfile(src, dst)  # os.rename(src, dst)
                        print('converting %s to %s ...' % (src, dst))
                        i = i + 1
                    except:
                        continue
            print('total %d to rename & converted %d jpgs' % (total_num, i))

    def split(self):
        # ---------------------------------------
        # train_test
        images_path = PATH_ALL_IMAGES
        train_save_path = PATH_TRAIN
        test_save_path = PATH_TEST
        if not os.path.isdir(train_save_path):
            os.mkdir(train_save_path)
            os.mkdir(test_save_path)

        for _, dirs, _ in os.walk(images_path, topdown=True):
            for i, dir in enumerate(dirs):
                for root, _, files in os.walk(images_path + '/' + dir, topdown=True):
                    for j, file in enumerate(files):
                        if (j == 0):  # test dataset;每个车辆的第一幅图片
                            print("序号:%s  文件夹: %s  图片:%s 归为测试集" % (i + 1, root, file))
                            src_path = root + '/' + file
                            dst_dir = test_save_path + '/' + dir
                            if not os.path.isdir(dst_dir):
                                os.mkdir(dst_dir)
                            dst_path = dst_dir + '/' + file
                            move(src_path, dst_path)
                        else:
                            src_path = root + '/' + file
                            dst_dir = train_save_path + '/' + dir
                            if not os.path.isdir(dst_dir):
                                os.mkdir(dst_dir)
                            dst_path = dst_dir + '/' + file
                            move(src_path, dst_path)
        rmtree(PATH_ALL_IMAGES)


if __name__ == '__main__':
    demo = BatchRename()
    demo.resize()
    demo.rename()
    demo.split()
0x01 参数调整
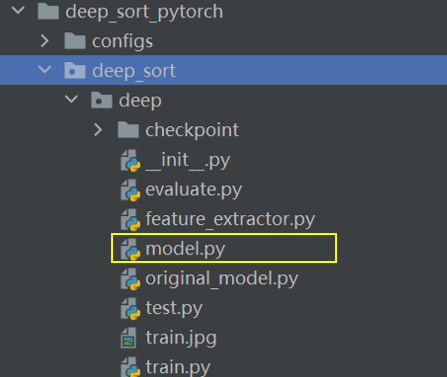
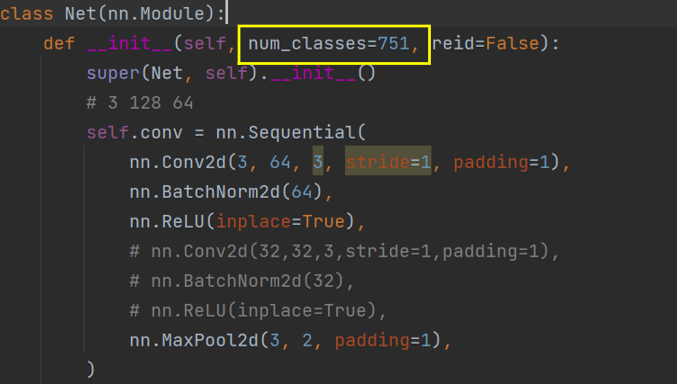
1.修改model.py
根据数据集中的类别,修改num_classes:

🚩注:
数据集划分好后train和test文件夹下分别有多少个子文件夹,就代表有多少个类别。
即num_classes的数量。
2.修改train.py

--data-dir:数据集文件,修改数据集的路径。
--lr:学习率,可以不用修改。
根据需求修改epoches的次数:

可以修改权重保存的位置以及命名,以免发生覆盖:

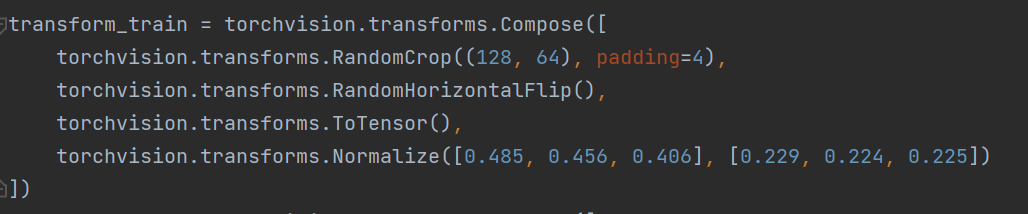
修改dataset的预处理:
修改完成后,运行train.py开始训练,最终得到的权重结果保存在deep/checkpoint中。
至此,Deepsort部分已经全部结束。
Ⅱ 生成视频&轨迹绘制
0x00 参数设置
将之前yolov5训练后得到的best.pt和Deepsort训练后得到的权重替换到track.py中:

修改视频的地址:

运行track.py,得到最终视频,并在视频中显示运动轨迹。
Ⅲ 常见报错分析
为了方便新手小白快速上手,解决报错,暂不讲解报错的具体原因,只给出如何解决报错(给出最简单的解决办法),若想进一步了解报错的具体原因,可以在评论区一起交流。
0x00 未修改num_classes
报错:

解决方法:
在model.py中修改num_classes
0x01 梯度问题
报错:
这个错误是由于在计算梯度的过程中,对一个叶子节点(leaf Variable)进行了原地操作(in-place operation),导致了运行时错误。PyTorch中默认情况下,autograd不支持对叶子节点进行原地操作,因为这会导致梯度计算不正确。
解决方法:
在models文件夹下的yolo.py文件中:

添加代码:
with torch.no_grad():0x02 显存不足
报错:

解决方法(这里提供一个最简单的方法):
更改batch_size的大小和epoch的次数。
或者释放内存:
if hasattr(torch.cuda, 'empty_cache'):
	torch.cuda.empty_cache()
❓有更多报错大家可以写在评论区,博主看到后会尽力帮助大家。
0x03 Wandb问题
报错:

解决方法:
直接关闭wandb。
在wandb_utils.py中,将开头部分的代码:
 try:
    import wandb
    from wandb import init, finish
except ImportError:
    wandb = None
改为:
try:
    import wandb
    from wandb import init, finish
except ImportError:
    wandb = None
wandb = None
0x04 权重pt文件不匹配
报错:
权重pt文件和新环境的YOLOv5的小版本不相同
报错代码:
YoloV5:AttributeError: Can‘t get attribute ‘C3‘ on <module ‘models.common‘ from解决方法:在common.py中加入C3和SPPF模块:
#在最上面需要引入warnings库
import warnings

class C3(nn.Module):
    # CSP Bottleneck with 3 convolutions
    def __init__(self, c1, c2, n=1, shortcut=True, g=1, e=0.5):  # ch_in, ch_out, number, shortcut, groups, expansion
        super(C3, self).__init__()
        c_ = int(c2 * e)  # hidden channels
        self.cv1 = Conv(c1, c_, 1, 1)
        self.cv2 = Conv(c1, c_, 1, 1)
        self.cv3 = Conv(2 * c_, c2, 1)  # act=FReLU(c2)
        self.m = nn.Sequential(*[Bottleneck(c_, c_, shortcut, g, e=1.0) for _ in range(n)])
        # self.m = nn.Sequential(*[CrossConv(c_, c_, 3, 1, g, 1.0, shortcut) for _ in range(n)])

    def forward(self, x):
        return self.cv3(torch.cat((self.m(self.cv1(x)), self.cv2(x)), dim=1))


class SPPF(nn.Module):
    # Spatial Pyramid Pooling - Fast (SPPF) layer for YOLOv5 by Glenn Jocher
    def __init__(self, c1, c2, k=5):  # equivalent to SPP(k=(5, 9, 13))
        super().__init__()
        c_ = c1 // 2  # hidden channels
        self.cv1 = Conv(c1, c_, 1, 1)
        self.cv2 = Conv(c_ * 4, c2, 1, 1)
        self.m = nn.MaxPool2d(kernel_size=k, stride=1, padding=k // 2)

    def forward(self, x):
        x = self.cv1(x)
        with warnings.catch_warnings():
            warnings.simplefilter('ignore')  # suppress torch 1.9.0 max_pool2d() warning
            y1 = self.m(x)
            y2 = self.m(y1)
            return self.cv2(torch.cat([x, y1, y2, self.m(y2)], 1))
0x05 YOLOv5断后继续训练
YOLOv5自带断点保存,可以恢复训练。
在train.py中,把![]()
改为:
parser.add_argument('--resume', nargs='?', const=True, default=True, help='resume most recent training')
即default 后改为True。
运行程序,可以看到从上次中断得到地方继续训练了。

END
📝因为作者的能力有限,所以文章可能会存在一些错误和不准确之处,恳请大家指出!
| 📃参考文献: [1] Simple Online and Realtime Tracking with a Deep Association Metric [1703.07402] Simple Online and Realtime Tracking with a Deep Association Metric (arxiv.org) |