一、说在前面
小伙伴们好,博主很久没有写博客了,略感生疏,不到之处敬请谅解,欢迎指出文中错误,大家一起探讨。欲看视频讲解,可转至博主DouYin、B站,欢迎关注,链接如下:
Github: samylee (samylee) · GitHub
DY: samylee_csdn
B站:samylee
二、写作初衷
YOLO系列详解博客网上很多且质量很高,但大多数都是已文字和图像的形式呈现,未能结合代码做进一步阐述。且yolov1/v2是纯c代码,调试困难,无法直观反映训练和测试过程。所以博主将该代码转到PyTorch下,可一目了然理清Darknet作者的算法思路。话不多说,下面开始!
三、YOLOV1预训练模型
众所周知,在当时预训练模型的性能会直接影响整个检测网络的效果,所以设计出一款好的分类模型是做检测任务的必经之路。分类网络原理部分这里不做进一步阐述了,博主会开设另外系列博客讲解分类网络,敬请期待。
Darknet作者采用自研的extraction网络,在当时已经达到SOTA水平,且速度明显优于同时期SOTA模型,性能如下图所示。
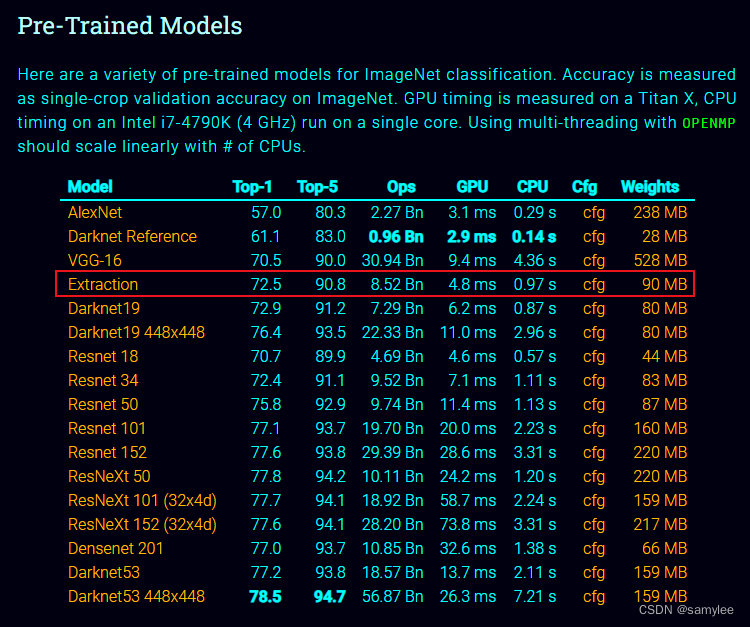
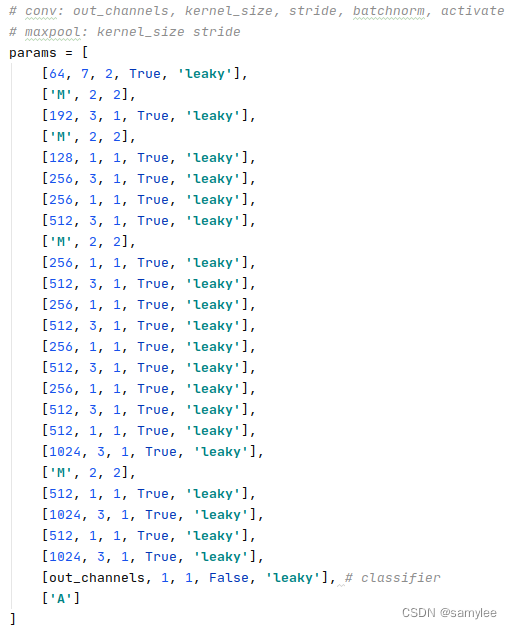
网络设计方面作者采用直到型架构,因当时何恺明等大神尚未提出残差网络,所以直到型还是主流网络架构,如下图所示,其中'M'表示最大池化层,'A'表示平均池化层。
四、Extraction网络转PyTorch
网络转换需要注意三个地方:
1、要求将Extraction网络按照其特定的网络序列复写出PyTorch的网络架构,切不可心浮气躁;
2、Darknet存储参数的序列和PyTorch稍有不同,若遇到BatchNorm架构的卷积层,Darknet会先存储BatchNorm层的参数,进而存储卷积层的参数;
3、图像数据预处理部分,Darknet分类网络的顺序是:BGR2RGB->Norm(1/255)->Resize->Crop,所以我们在复现的时候一定要按照该顺序进行数据预处理操作。
网络复现如下,版本PyTorch1.4,Python3.6,博主暂未加PyTorch的训练代码,因ImageNet训练时间较长,所以直接使用了Extraction的网络模型,若有需要的小伙伴可以评论或私信给博主,博主可添加Extraction分类网络的PyTorch的训练方法。
import torch
import torch.nn as nn
import torch.nn.functional as F
import cv2
import numpy as np


class ExtractionNet(nn.Module):
    def __init__(self, in_channels=3, num_classes=1000, init_weights=True, phase='train'):
        super(ExtractionNet, self).__init__()
        self._phase = phase
        self.features = self.make_layers(in_channels=in_channels, out_channels=num_classes)
        if init_weights:
            self._initialize_weights()

    def forward(self, x):
        for feature in self.features:
            x = feature(x)

        if self._phase == 'test':
            x = torch.flatten(x, 1)
            x = F.softmax(x, dim=-1)
        return x

    def _initialize_weights(self):
        for m in self.modules():
            if isinstance(m, nn.Conv2d):
                nn.init.kaiming_normal_(m.weight, mode='fan_in', nonlinearity='leaky_relu')
                if m.bias is not None:
                    nn.init.constant_(m.bias, 0)
            elif isinstance(m, nn.BatchNorm2d):
                nn.init.constant_(m.weight, 1)
                nn.init.constant_(m.bias, 0)
            elif isinstance(m, nn.Linear):
                nn.init.normal_(m.weight, 0, 0.01)
                nn.init.constant_(m.bias, 0)

    def make_layers(self, in_channels=3, out_channels=1000):
        # conv: out_channels, kernel_size, stride, batchnorm, activate
        # maxpool: kernel_size stride
        params = [
            [64, 7, 2, True, 'leaky'],
            ['M', 2, 2],
            [192, 3, 1, True, 'leaky'],
            ['M', 2, 2],
            [128, 1, 1, True, 'leaky'],
            [256, 3, 1, True, 'leaky'],
            [256, 1, 1, True, 'leaky'],
            [512, 3, 1, True, 'leaky'],
            ['M', 2, 2],
            [256, 1, 1, True, 'leaky'],
            [512, 3, 1, True, 'leaky'],
            [256, 1, 1, True, 'leaky'],
            [512, 3, 1, True, 'leaky'],
            [256, 1, 1, True, 'leaky'],
            [512, 3, 1, True, 'leaky'],
            [256, 1, 1, True, 'leaky'],
            [512, 3, 1, True, 'leaky'],
            [512, 1, 1, True, 'leaky'],
            [1024, 3, 1, True, 'leaky'],
            ['M', 2, 2],
            [512, 1, 1, True, 'leaky'],
            [1024, 3, 1, True, 'leaky'],
            [512, 1, 1, True, 'leaky'],
            [1024, 3, 1, True, 'leaky'],
            [out_channels, 1, 1, False, 'leaky'], # classifier
            ['A']
        ]

        module_list = nn.ModuleList()
        for i, v in enumerate(params):
            modules = nn.Sequential()
            if v[0] == 'M':
                modules.add_module(f"maxpool_{i}", nn.MaxPool2d(kernel_size=v[1], stride=v[2], padding=int((v[1] - 1) // 2)))
            elif v[0] == 'A':
                modules.add_module(f"avgpool_{i}", nn.AdaptiveAvgPool2d((1, 1)))
            else:
                modules.add_module(
                    f"conv_{i}",
                    nn.Conv2d(
                        in_channels,
                        v[0],
                        kernel_size=v[1],
                        stride=v[2],
                        padding=(v[1] - 1) // 2,
                        bias=not v[3]
                    )
                )
                if v[3]:
                    modules.add_module(f"bn_{i}", nn.BatchNorm2d(v[0]))
                modules.add_module(f"act_{i}", nn.LeakyReLU(0.1) if v[4] == 'leaky' else nn.ReLU())
                in_channels = v[0]
            module_list.append(modules)
        return module_list


def load_darknet_weights(model, weights_path):
    # Open the weights file
    with open(weights_path, "rb") as f:
        # First five are header values
        header = np.fromfile(f, dtype=np.int32, count=4)
        header_info = header  # Needed to write header when saving weights
        seen = header[3]  # number of images seen during training
        weights = np.fromfile(f, dtype=np.float32)  # The rest are weights

    ptr = 0
    for module in model.features:
        if isinstance(module[0], nn.Conv2d):
            conv_layer = module[0]
            if isinstance(module[1], nn.BatchNorm2d):
                # Load BN bias, weights, running mean and running variance
                bn_layer = module[1]
                num_b = bn_layer.bias.numel()  # Number of biases
                # Bias
                bn_b = torch.from_numpy(
                    weights[ptr: ptr + num_b]).view_as(bn_layer.bias)
                bn_layer.bias.data.copy_(bn_b)
                ptr += num_b
                # Weight
                bn_w = torch.from_numpy(
                    weights[ptr: ptr + num_b]).view_as(bn_layer.weight)
                bn_layer.weight.data.copy_(bn_w)
                ptr += num_b
                # Running Mean
                bn_rm = torch.from_numpy(
                    weights[ptr: ptr + num_b]).view_as(bn_layer.running_mean)
                bn_layer.running_mean.data.copy_(bn_rm)
                ptr += num_b
                # Running Var
                bn_rv = torch.from_numpy(
                    weights[ptr: ptr + num_b]).view_as(bn_layer.running_var)
                bn_layer.running_var.data.copy_(bn_rv)
                ptr += num_b
            else:
                # Load conv. bias
                num_b = conv_layer.bias.numel()
                conv_b = torch.from_numpy(weights[ptr: ptr + num_b]).view_as(conv_layer.bias)
                conv_layer.bias.data.copy_(conv_b)
                ptr += num_b
            # Load conv. weights
            num_w = conv_layer.weight.numel()
            conv_w = torch.from_numpy(weights[ptr: ptr + num_w]).view_as(conv_layer.weight)
            conv_layer.weight.data.copy_(conv_w)
            ptr += num_w


if __name__ == '__main__':
    # load moel
    checkpoint_path = "extraction.weights"
    model = ExtractionNet(phase='test')
    load_darknet_weights(model, checkpoint_path)
    model.eval()

    # model input size
    net_size = 224

    # load img
    img = cv2.imread('dog.jpg')
    # img bgr2rgb
    img_rgb = cv2.cvtColor(img, cv2.COLOR_BGR2RGB)

    # resize img
    h, w, _ = img_rgb.shape
    new_h, new_w = h, w
    if w < h:
        new_h = (h * net_size) // w
        new_w = net_size
    else:
        new_w = (w * net_size) // h
        new_h = net_size
    img_resize = cv2.resize(img_rgb, (new_w, new_h))

    # crop img
    cut_w = (new_w - net_size) // 2
    cut_h = (new_h - net_size) // 2
    img_crop = img_resize[cut_h:cut_h + net_size, cut_w:cut_w + net_size, :]

    # float
    img_crop = torch.from_numpy(img_crop.transpose((2, 0, 1)))
    img_float = img_crop.float().div(255).unsqueeze(0)

    # forward
    result = model(img_float)

    print(result.topk(5))
五、写在后面
小伙伴们若能坚持完成YOLO系列的代码和原理学习,相信能对图像检测任务有个全新的认识,跟随博主的脚步,培养自己的动手能力吧!希望博主也能坚持将该系列做下去,一起加油!!!
六、参考
1、ImageNet Classification
2、https://github.com/AlexeyAB/darknet